



Choose the Right Load Resistor for LED Turn Signals

Table of Contents
- Why Load Resistors Matter for LED Turn Signal Conversions
- Understanding Hyperflash and Why LEDs Cause Rapid Blinking
- How to Size Your LED Turn Signal Load Resistor
- One Load Resistor Per Side or Per Bulb: What You Actually Need
- Load Resistor Wiring for LED Turn Signals
- LED-Compatible Flasher Relay vs Load Resistor
- Heat, Safety, and Proper Resistor Mounting
- Vehicle-Specific Compatibility and Circuit Variations
- Frequently Asked Questions
Last Updated: October 6, 2026
Why Load Resistors Matter for LED Turn Signal Conversions
When you swap incandescent turn signal bulbs for LEDs and install load resistor LED turn signals, you're not just changing the light source. You're changing the electrical load your vehicle's circuit sees. That matters because your car's turn signal system was engineered for the power draw of old-style bulbs.
A load resistor for LED turn signals solves this mismatch. It mimics the electrical load of the original incandescent bulb, so your flasher relay behaves normally. The turn signal blinks at the correct rate, and your dashboard indicator stays steady instead of flashing rapidly.
At RMS Lighting LLC, we see this question come up constantly. Drivers want the brightness and longevity of LEDs but don't want dashboard warning lights or strange blinking patterns.
Understanding Hyperflash and Why LEDs Cause Rapid Blinking
Hyperflash is the rapid, almost strobe-like blinking you see when an LED turn signal blinks too fast. A standard incandescent turn signal bulb draws about 21 watts. A typical LED replacement draws 3 to 5 watts. Your flasher relay measures current draw. When it sees the much lower current, it assumes the bulb has burned out.


This happens because flasher relays use a thermal or electronic sensing mechanism. They're designed to detect when a bulb fails by measuring the electrical load in the circuit. LEDs break this assumption. They work fine, but the relay doesn't know that.
The blink rate typically jumps from the normal 60-120 blinks per minute to 200+ blinks per minute. It's noticeable, distracting, and makes your vehicle look like something is wrong. More importantly, it doesn't comply with traffic safety standards, which specify a steady, moderate flash rate for turn signals.
How to Size Your LED Turn Signal Load Resistor
Sizing a load resistor correctly is the difference between a working solution and one that generates heat, fails early, or doesn't solve the hyperflash problem at all. The goal is to make your LED circuit "look like" the original incandescent circuit to your flasher relay.
Calculating Wattage and Resistance
Start with the wattage of the original incandescent bulb. Most turn signal bulbs are either 21W (rear) or 7W (front), though some vehicles use different ratings. Check your owner's manual or the bulb itself for the exact wattage.
The resistor needs to dissipate the power difference between the incandescent and the LED. Here's the math:
Power to dissipate = Original bulb wattage − LED bulb wattage
If you're replacing a 21W incandescent with a 5W LED, you need to dissipate 16 watts. That's what your resistor must handle.
Next, calculate resistance using Ohm's Law. You need the vehicle's electrical voltage, which is almost always 12V for cars and trucks.
Resistance (Ohms) = Voltage² ÷ Power to dissipate
Example: 12V² ÷ 16W = 144 ÷ 16 = 9 Ohms
So you'd need a 9-ohm resistor rated for at least 16 watts. In practice, you'd use the nearest standard resistor value, which is 10 ohms. Always round up on wattage rating. A 20W or 25W resistor is safer than a 16W resistor for the same resistance value.
Common Resistor Values and When to Use Them
Standard resistor values for turn signal applications fall into predictable ranges. Here are the most common:
- 6-8 Ohms, 25W+: For rear turn signals converting from 21W incandescent to 5W LED. Most common scenario.
- 10-15 Ohms, 25W+: For vehicles with lower-wattage original bulbs or dual-filament bulbs where only one function is being converted.
- 20-25 Ohms, 10-15W: For front turn signals or marker lights with lower original wattage.
When in doubt, measure the original bulb wattage from the owner's manual and the LED bulb wattage from the product specs. Then use the calculation above. A resistor that's slightly oversized (higher wattage rating) is always safer than one that's undersized.
One Load Resistor Per Side or Per Bulb: What You Actually Need
This is where confusion creeps in. The answer depends on your vehicle's wiring and how many bulbs you're converting on each side.
Most vehicles have one turn signal bulb per corner (front left, front right, rear left, rear right). If you're converting all four to LEDs, you need one load resistor per side (left and right).
However, if your vehicle has separate front and rear turn signal circuits that don't share a common wire, you may need one resistor per bulb.
The key is understanding your circuit. If both the front and rear turn signals on the left side share the same positive and negative wires, one resistor handles both.
When in doubt, install one resistor per side first. If hyperflash persists, you likely have a dual-circuit system and need a second resistor for the other circuit.
Load Resistor Wiring for LED Turn Signals
Parallel Wiring Across Positive and Negative Circuits
The resistor must be wired in parallel with the LED bulb circuit. This means it connects across the same positive and negative wires that power the bulb. When current flows, some goes through the LED bulb and some through the resistor. The combined current mimics the original incandescent load.
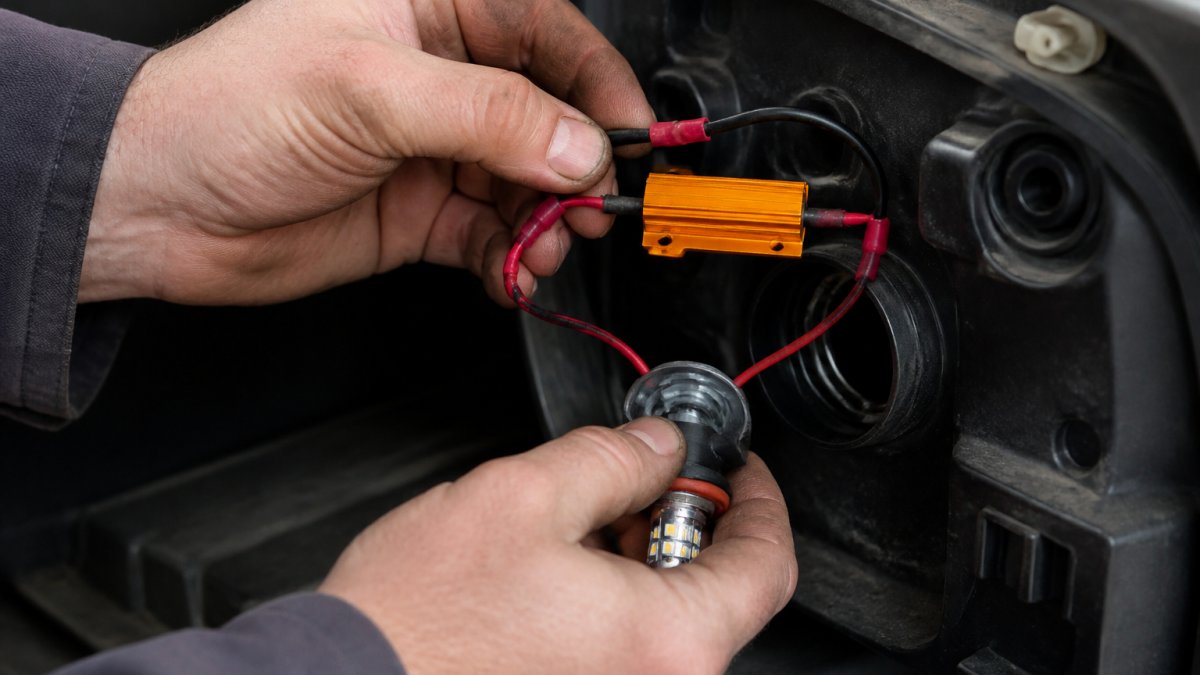
Never wire a resistor in series (in line with the bulb). A series resistor would reduce voltage to the LED, dimming it and potentially preventing it from lighting at all.
Parallel wiring is straightforward: the resistor's positive lead connects to the positive wire of the turn signal circuit. The negative lead connects to the negative wire or ground. The LED bulb sits in its socket, also connected to the same positive and negative points. Both the resistor and the bulb see the full 12V.
Where to Tap Into the Circuit
You have three main options for where to install the resistor:
RMS1157SB Switchback Canbus White / Amber LED Bulbs →
Option 1: Inside the light housing Solder or crimp the resistor leads directly to the bulb socket wires. This is compact and keeps everything contained. The downside: heat builds up inside the housing, and the resistor can cook in summer heat.
Option 2: Inline under the vehicle Tap into the positive and negative wires near the light assembly, run the resistor away from the housing (under the bumper or along the chassis), and secure it with zip ties or a mounting bracket. This allows better air circulation and is easier to service later.
Option 3: At the flasher relay Install the resistor directly at the flasher relay or in the fuse box. This works if you're only converting one side. It's the cleanest electrically but requires more involved wiring.
For most DIY installations, Option 2 is the sweet spot. It keeps heat away from the light housing and gives you room to work without cramping.
LED-Compatible Flasher Relay vs Load Resistor
Some vehicles benefit from swapping the flasher relay instead of adding a resistor. An LED-compatible flasher relay is designed to recognize LED circuits and adjust its sensing mechanism accordingly.
The trade-off: a new flasher relay costs money and requires locating the relay (often under the dash) and swapping it out.
Which one is right for you? If your vehicle has an accessible flasher relay and you're converting all four corners to LEDs, a new relay may be cleaner.
RMS Lighting LLC offers the EP27 LED Flasher Relay for vehicles that use an EP27-style flasher. This relay eliminates the need for external load resistors on compatible systems.
Some drivers use both: a new flasher relay plus a resistor. This provides redundancy and ensures compatibility even if the relay doesn't fully solve the problem on its own.
Heat, Safety, and Proper Resistor Mounting
A load resistor dissipates energy as heat. That's by design. A 16-watt resistor running continuously generates noticeable warmth. You need to account for this when choosing a mounting location.
Never mount a resistor inside the light housing where it can't breathe. The housing will trap heat, and the resistor can overheat and fail.
Use a resistor rated for at least 25 watts for rear turn signals. This gives you a safety margin. A 25W resistor dissipating 16W runs cooler than a 16W resistor at its rated limit.
Mount the resistor in open air, away from fuel lines, brake lines, and wiring bundles. Under the bumper, along the frame, or inside the fender well are typical locations.
Check your installation after 30 minutes of operation. The resistor should be warm to the touch but not too hot to hold for a few seconds.
Vehicle-Specific Compatibility and Circuit Variations
Not all vehicles behave the same. Some have LED-compatible flasher relays from the factory. Others have CANbus systems that monitor bulb health electronically.
Check your owner's manual for any mention of LED bulbs or turn signal compatibility. Some manufacturers explicitly state whether LEDs will cause hyperflash or if a relay upgrade is needed.

Older vehicles (pre-2000) typically have simple thermal flasher relays. They almost always need a load resistor when converting to LEDs. Newer vehicles (2010+) increasingly use electronic flashers or CANbus monitoring.
The safest approach: start with a load resistor. RMS Lighting LLC's switchback LED bulbs are CanBus compatible and designed to work with modern electrical systems, reducing the need for additional resistors on compatible vehicles.
Test your installation in a safe location before relying on the turn signals in traffic. Confirm the blink rate is normal and the dashboard indicator is steady, not flashing rapidly.
Choosing the right load resistor LED turn signals doesn't require an engineering degree.
If you're upgrading to LEDs and want bulbs engineered to minimize compatibility issues, RMS Lighting LLC's CanBus-compatible switchback bulbs are designed to work with modern turn signal systems. Get started with RMS Lighting LLC's LED turn signal solutions and enjoy brighter, more reliable turn signals that look factory-correct.
Frequently Asked Questions
Do I need a load resistor for LED turn signals?
Yes, in most cases. When you replace incandescent turn signal bulbs with LED bulbs, the lower electrical load can confuse your vehicle's flasher relay, causing hyperflash (rapid blinking). A load resistor mimics the electrical load of the original incandescent bulb, restoring normal flash rates. However, some vehicles with modern CANbus systems or LED-compatible flasher relays may not require one. Check your vehicle's manual or test the LED bulbs first to confirm whether hyperflash occurs.
What size load resistor should I use for LED turn signals?
The resistor size depends on your LED bulb's wattage and your vehicle's electrical system. Most LED turn signal conversions use a 25-watt resistor to match the original 21-watt incandescent bulb's load. To calculate the correct resistance value in ohms, divide the voltage (typically 12 volts) squared by the desired wattage. For example, 144 ÷ 25 = 5.76 ohms. Common values are 5-ohm, 6-ohm, or 8-ohm resistors rated for 25 watts. Always verify your LED bulb's specifications and your vehicle's voltage before selecting a resistor.
Do I need one load resistor per side or per bulb?
You need one load resistor per side (per corner), not per bulb. A single resistor installed on the front left or front right turn signal circuit will handle both bulbs on that side if they share the same flasher relay circuit. However, if your vehicle has separate front and rear turn signal circuits, you'll need resistors on both the front and rear circuits. Check your vehicle's wiring diagram to confirm whether front and rear signals share a circuit or operate independently.
Is an LED-compatible flasher relay better than a load resistor?
An LED-compatible flasher relay can be a better solution than a load resistor in many cases because it eliminates the need for external resistors altogether, reduces heat generation, and takes up less space. However, resistors are more affordable and work reliably in most vehicles. If your vehicle uses an EP27-style or similar LED-compatible relay, replacing the factory flasher is often the cleanest option. For older vehicles or those with non-standard electrical systems, load resistors remain the most practical choice. Some vehicles may require both solutions depending on circuit complexity.