



DIY Automotive Lighting Upgrade Tips 2026

Table of Contents
- Understanding LED Conversion Kits vs. Halogen Bulbs
- What You'll Need: Essential Automotive Lighting Installation Tools
- Step-by-Step LED Headlight Installation Process
- Beam Pattern, Cutoff Alignment, and Safety Standards
- How to Aim Headlights After LED Upgrade
- Selecting DOT-Compliant LED Headlight Conversion Kits
- Troubleshooting Common Issues: Error Codes and Flickering
- Durability, Heat Dissipation, and Long-Term Maintenance
Last Updated: August 8, 2026
Understanding LED Conversion Kits vs. Halogen Bulbs
LED conversion kits replace factory halogen bulbs with modern technology, dramatically improving visibility and efficiency. Halogen bulbs heat a filament to produce light through incandescence, wasting most energy as heat. LED bulbs use semiconductor diodes to produce light directly, consuming roughly half the power while producing significantly more output.
This efficiency gap has immediate practical benefits: your vehicle's electrical system works less hard, your alternator strains less, and battery drain decreases noticeably. LED bulbs maintain consistent output throughout their lifespan, typically lasting 25,000-50,000 hours, versus 500-1,000 hours for halogen. Halogen bulbs also dump enormous heat into your headlight housing, warping plastic and degrading reflector coatings. Quality LED conversion kits include aluminum heat sinks that safely dissipate thermal energy and protect your factory housing.
At RMS Lighting LLC, we've engineered our LED conversion kits to address the specific challenges of retrofitting older vehicles. Our bulbs use premium CANBUS technology to prevent error codes and flickering, problems that plague cheaper alternatives. The beam pattern is precisely calibrated to match your factory optics, ensuring legal compliance and safe cutoff alignment.

What You'll Need: Essential Automotive Lighting Installation Tools
Before starting your installation, gather these essential items:
Basic hand tools: Socket set (10mm and 13mm sockets), screwdrivers (Phillips and flathead), torque wrench (15-25 Nm), needle-nose pliers, panel removal tools, and work light.
Electrical and safety equipment: Battery disconnect tool, electrical tape, dielectric grease, multimeter (optional), safety glasses, and work gloves.
Vehicle-specific items: Service manual for your vehicle year and model, OEM-style connector plugs if needed, and CANBUS decoder relay (required for vehicles that throw error codes).
Quality tools directly affect installation speed and safety. A proper torque wrench prevents over-tightening, which can crack plastic headlight housings. Always disconnect the battery before handling electrical connectors, thirty seconds of preparation prevents expensive repairs.
Step-by-Step LED Headlight Installation Process
Choosing the Right Bulb Type for Your Vehicle
Your vehicle uses one of several standard headlight bulb types: H4, H7, H11, 9005, or 9006. Compatibility is non-negotiable. Check your service manual or look at your current halogen bulb, the type is printed on the base. H4 bulbs are dual-filament (high and low beam in one bulb), while H7, H11, 9005, and 9006 are single-filament designs.
The RMS Lighting LLC RMSH4S130 uses premium 130-watt CANBUS technology, producing 30,000 lumens at 6500K color temperature, a significant jump from factory halogen output of 1000-1500 lumens per bulb. Kelvin rating affects both visibility and legal compliance. Factory halogen bulbs run around 3200K, producing yellowish light. LED conversions typically use 5500K-6500K, appearing bright white and matching modern standards.
Check your vehicle's electrical specifications before purchasing. Some older vehicles use 12-volt systems exclusively; others have dual 12/24-volt systems. Installing a 24-volt LED bulb in a 12-volt system causes immediate failure.
Removing the Factory Headlight Assembly
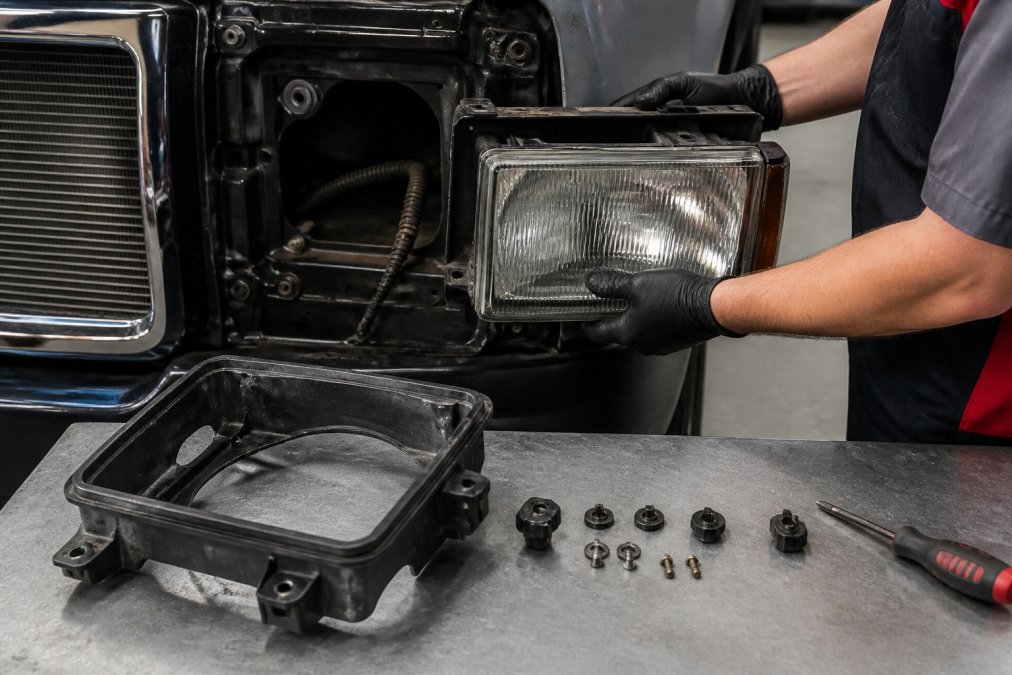
Disconnect the negative battery terminal first and wait five minutes for residual electrical charge to dissipate. Locate your headlight assembly fasteners, most vehicles have 2-4 bolts per headlight. Remove fasteners carefully; headlight housings crack easily under excessive force. If a bolt won't turn, apply penetrating oil and wait 10 minutes. Once fasteners are removed, gently pull the assembly forward and depress the connector tab to disconnect the wiring.
Inspect the headlight housing interior for moisture, debris, or damaged reflector surfaces. If you see moisture, the housing seal has failed and will need resealing after installation.
Installing the LED Bulb and Securing Components
Remove the rubber dust cover from the back of the headlight housing with a simple twist-and-pull operation. Locate the bulb socket and twist counterclockwise to remove it. Align your new LED bulb with the contact points and insert it carefully, twisting clockwise until snug. Don't force it, LED bulbs are precision components.
Connect the wiring harness to your new LED bulb. If your vehicle uses CANBUS systems (most 2008 and newer), connect the CANBUS decoder relay as well. This small device prevents error codes and flickering by managing the electrical signal between your vehicle's computer and the LED bulb. RMS Lighting LLC's CANBUS-equipped bulbs include the decoder in the wiring harness.

Reinstall the dust cover firmly until it seats completely. Carefully guide the assembly back into the vehicle, aligning fastener holes with mounting points. Hand-tighten all bolts first to ensure proper alignment, then use your torque wrench to tighten to specification. Reconnect the electrical connector and verify it's locked in place. Installation typically takes 1-3 hours per vehicle.
Beam Pattern, Cutoff Alignment, and Safety Standards
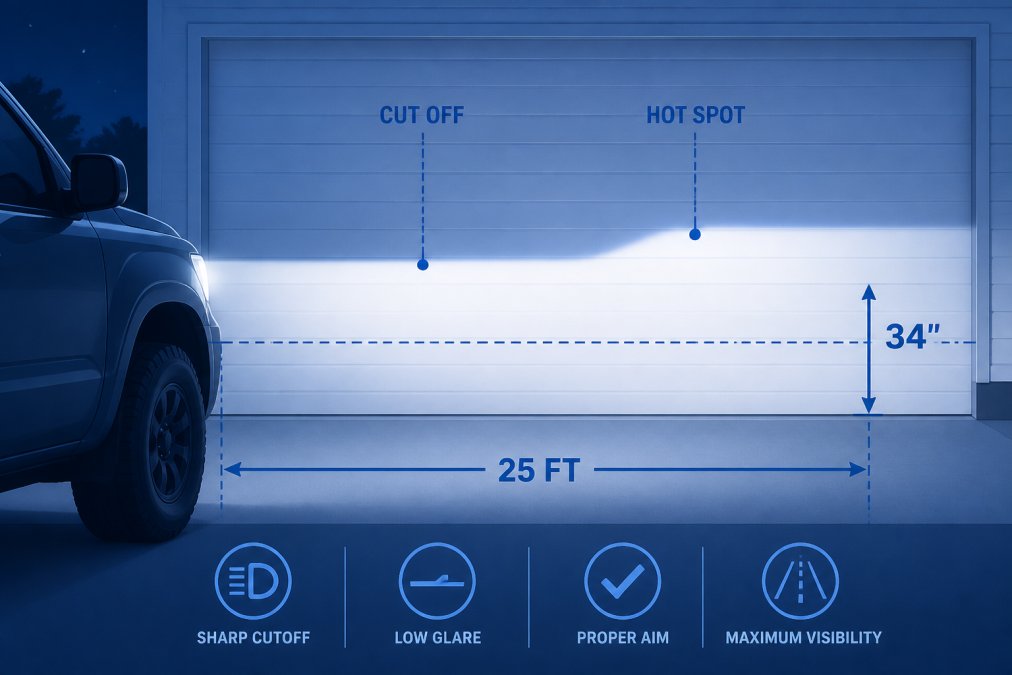
Your headlight beam pattern determines visibility and legal compliance. A proper cutoff line, the sharp boundary between illuminated and dark areas, prevents glare to oncoming drivers while maximizing your visibility.
LED bulbs have a different light-emitting surface than halogen filaments, which can alter beam patterns if not carefully engineered. Quality LED conversion kits account for this by using optical elements that match your factory reflector design. RMS Lighting LLC's conversion kits are engineered specifically for your vehicle's headlight housing optics, with beam patterns tested to ensure they match or exceed factory specifications.
The cutoff line is critical for legal compliance. The National Highway Traffic Safety Administration (NHTSA) headlight standards require a defined cutoff line that prevents light from projecting above the horizontal plane at certain distances. Improper beam alignment causes poor visibility and can result in citations.
How to Aim Headlights After LED Upgrade
After installation, your headlights likely need aiming adjustment. Park your vehicle 25 feet from a level wall on level ground in a dark environment. Turn on your low beams and mark the center of each beam on the wall with tape.
The cutoff line should be roughly at the height of your headlight center, with the beam angling slightly downward. Most vehicles have headlight aiming screws accessible from inside the engine bay, typically located on the top and sides of the headlight assembly. Make small adjustments in quarter-turn increments. After each adjustment, step back and observe the wall pattern. This iterative process takes 10-15 minutes but ensures proper alignment.
Selecting DOT-Compliant LED Headlight Conversion Kits
DOT compliance means your lighting meets Federal Motor Vehicle Safety Standard (FMVSS) 108, which governs headlight performance in the United States. Many aftermarket LED bulbs claim DOT compliance but don't actually meet the standard. The difference is whether the manufacturer has tested the bulb in the specific headlight housing it's designed for.
RMS Lighting LLC's conversion kits are tested in the specific housings they're designed for. Our 7" round conversion kit (RMS3321S130) uses 30,000 lumen H4 LED bulbs engineered for classic vehicles with sealed-beam headlights, with proper reflector geometry and optical elements to ensure legal beam patterns.
When evaluating conversion kits, ask: Has the kit been tested in the specific headlight housing for your vehicle? Does the manufacturer provide beam pattern documentation? Is there a warranty covering electrical failures? Does the kit include CANBUS decoders for vehicles that require them? The cost difference between quality and cheap kits is typically $50-100, negligible compared to failed inspections or accidents caused by poor visibility.
Troubleshooting Common Issues: Error Codes and Flickering
Resolving CANbus Error Codes
Modern vehicles monitor headlight circuits through the CANBUS electrical system. When you install LED bulbs without proper decoders, the vehicle's computer detects a change in electrical load and triggers a warning light on the dashboard. LED bulbs draw significantly less current than halogen bulbs, so the computer interprets this as a bulb failure.
The solution is a CANBUS decoder, a small module that simulates the electrical load of a halogen bulb while the LED bulb operates normally. RMS Lighting LLC's CANBUS-equipped LED bulbs include the decoder in the wiring harness, eliminating separate installation. If you're experiencing error codes after installation, first verify that your CANBUS decoder is connected properly. If error codes persist, the decoder itself may be faulty. Contact the manufacturer for a replacement.
Fixing Hyper-Flashing Turn Signals
Hyper-flashing occurs when you upgrade turn signal bulbs to LED. Your vehicle's turn signal circuit uses a thermal flasher relay that counts electrical pulses to determine flash rate. LED bulbs draw so little current that the relay thinks a bulb has failed and flashes rapidly.
The fix is a specialized LED flasher relay calibrated for low-current LED loads. These relays cost $8-15 and install in minutes. Locate your vehicle's flasher unit, typically mounted under the steering column or in the fuse panel. Pull it straight out and insert your new LED flasher relay in the same location, ensuring it's fully seated.

Durability, Heat Dissipation, and Long-Term Maintenance
Quality LED conversion kits last 25,000-50,000 hours versus 500-1,000 hours for halogen. This longevity depends entirely on thermal management. LED diodes generate heat that must be dissipated away from the diode junction, where it damages the semiconductor material and causes premature failure. Cheap LED bulbs skip proper heat sinks, resulting in diodes that fail within 2,000-5,000 hours.
Quality conversion kits use aluminum heat sinks with fins that increase surface area for heat dissipation. RMS Lighting LLC's bulbs use passive aluminum heat sinks engineered for your specific headlight housing, ensuring thermal management without additional power draw.
Moisture is the primary enemy of LED bulbs. Water entering the headlight housing corrodes internal connectors and can short the LED circuits. Inspect your dust covers regularly and reseal them with clear silicone if you notice moisture accumulation. Vibration also affects durability, ensure all mounting bolts are torqued to specification and check them annually.
Most quality LED conversion kits include 3-year warranties covering manufacturing defects. RMS Lighting LLC's conversion kits include a 3-year warranty on all electrical components, covering failures from manufacturing defects or normal use.
| Issue | Cause | Solution | Prevention |
|---|---|---|---|
| Hyper-flashing | LED draws less current than halogen | Install LED flasher relay | Use compatible flasher when upgrading turn signals |
| Error codes | Vehicle computer detects low current | Install CANBUS decoder | Choose LED bulbs with integrated decoders |
| Moisture in housing | Dust cover seal failure | Reseal with silicone, replace housing if cracked | Inspect covers annually, clean debris |
| Reduced brightness | Heat damage to LED diode | Replace bulb, check heat sink contact | Ensure proper thermal management during installation |
| Flickering | Loose connector or corroded contacts | Reseat connector, clean contacts | Use dielectric grease on all electrical connections |
Upgrading your automotive lighting transforms your driving experience and safety. Modern LED conversion kits deliver visibility that halogen bulbs cannot match, combined with reliability and efficiency gains that benefit your entire electrical system.
The key is choosing conversion kits engineered for your specific vehicle and installed correctly. RMS Lighting LLC's LED headlight conversion kits are rigorously tested and designed to integrate seamlessly with your factory electrical system. Our CANBUS technology prevents error codes, our heat sink design ensures long-term durability, and our 3-year warranty backs every product. Learn More about how our conversion kits can upgrade your vehicle's lighting today.
Frequently Asked Questions
Why do some LED headlight conversions cause dashboard error codes and hyper-flashing?
Factory vehicles use halogen bulbs that draw specific power levels. When you install standard LED bulbs without a CANbus decoder, your vehicle's electrical system detects the lower power draw and triggers error codes. Hyper-flashing occurs when turn signal relays don't recognize LED bulbs as valid loads. RMS Lighting's RMSH4S130 130W CANbus LED bulbs and compatible flasher relays solve this by matching factory electrical specifications and preventing these compatibility issues entirely.
Are aftermarket LED headlight conversions legal in the US?
LED conversions are legal only if they meet DOT (Department of Transportation) compliance standards and maintain the correct beam pattern with a proper cutoff line to prevent glare. Many aftermarket kits fail because they don't produce the required lumen output or beam alignment. DOT-compliant LED headlight conversion kits, like RMS Lighting's sealed beam options, are designed to meet these federal standards while providing superior visibility compared to factory halogen setups.
How do I know if an LED bulb will fit my vehicle's headlight housing without modification?
Check your vehicle's bulb socket type (H1, H7, H11, H4, etc.) in your owner's manual or by examining the factory bulb. Plug-and-play LED bulbs maintain the same socket design as halogen originals. However, some older vehicles with sealed beam housings require conversion kits rather than direct bulb replacements. RMS Lighting provides both bulb-only upgrades and full conversion kits to ensure compatibility without modification to your headlight assembly.
What's the difference between DOT-compliant and off-road LED lighting?
DOT-compliant lighting meets federal safety standards for on-road use, including beam pattern, cutoff line alignment, and lumen output limits to prevent blinding oncoming drivers. Off-road lighting has no such restrictions and often produces excessive glare unsuitable for public roads. If you're upgrading for street driving, always choose DOT-compliant kits. RMS Lighting's conversion kits feature correct LHD lens patterns and meet DOT standards for safe, legal on-road performance.
This article was written using GrandRanker