



How to Fix Hyperflashing Turn Signals: 3 Proven Methods

Table of Contents
- What Is Hyperflashing and Why Does It Happen?
- What You'll Need Before You Fix Hyperflashing Turn Signals
- Method 1: Flasher Relay Replacement for LED Turn Signals
- Method 2: LED Turn Signal Resistor Installation
- Method 3: Installing CANbus-Compatible LED Bulbs
- Troubleshooting Hyperflashing After Your Fix
- Which Method Should You Use to Fix Hyperflashing Turn Signals?
- Conclusion
Last Updated: August 1, 2026
Switching to LED turn signal bulbs is satisfying until your indicator blinks at triple speed. Knowing how to fix hyperflashing turn signals is the difference between a clean LED conversion and a frustrating electrical headache. This guide covers the three proven methods that actually solve it, in order of preference, starting with the flasher relay replacement that most guides bury at the bottom.

What Is Hyperflashing and Why Does It Happen?
Hyperflashing is rapid, faster-than-normal blinking of a turn signal, caused by a mismatch between your vehicle's turn signal circuit and the lower current draw of LED bulbs. Your vehicle's original flasher relay was calibrated for incandescent bulbs, which draw significantly more amperage than LEDs. When the circuit detects lower current, it interprets this as a burned-out bulb and increases the blink rate as a warning.

How Your Vehicle's Turn Signal Circuit Detects a Burned-Out Bulb
Most vehicles built before the mid-2010s use a thermal flasher design. A bimetallic strip inside heats up as current flows, bends, breaks the circuit, cools, and reconnects. The cycle speed depends directly on the resistance and current draw of the bulbs. Swap in LED bulbs, and the current drops sharply, causing the bimetallic strip to heat and cool faster, producing rapid blinking.
According to NHTSA vehicle lighting regulations and standards, turn signals must flash at 60-120 flashes per minute under federal standards. Hyperflashing typically exceeds 120 flashes per minute, creating both legal and safety concerns.
Visual Diagnostic Guide: Identifying Your Exact Hyperflash Symptom
Before choosing a fix, identify which symptom you have:
| Symptom | Likely Cause | Best Fix |
|---|---|---|
| All turn signals blink fast | Thermal flasher relay | Replace flasher relay |
| Only one side blinks fast | Single corner LED swap | Load resistor on that corner |
| Fast blink + dashboard error code | CANbus monitoring circuit | CANbus-compatible LED bulbs |
| Hazards also hyperflash | Shared flasher relay | Replace flasher relay |
| Blink rate varies with engine RPM | Voltage fluctuation | Check ground wire and alternator |
This diagnostic step saves money and prevents unnecessary parts installation.
What You'll Need Before You Fix Hyperflashing Turn Signals
Tools Required for the Installation
- Digital multimeter
- Wire stripper and crimping tool
- Electrical tape or heat-shrink tubing
- Zip ties
- Flathead and Phillips screwdrivers
- Needle-nose pliers
- Flasher relay puller or small flathead
- Zip-lock bag for storing OEM hardware
For load resistor installations, you'll also need self-tapping screws or zip ties to mount resistors to metal surfaces for heat dissipation.

Safety Precautions When Working With Automotive Wiring
- Disconnect the negative battery terminal before splicing any wires
- Never install load resistors touching plastic, rubber, or carpet; they generate significant heat
- Confirm ground wire connections are solid metal-to-metal contact
- Use correct wire gauge for any splice
- Test all connections before reinstalling trim
Method 1: Flasher Relay Replacement for LED Turn Signals
Replacing the thermal flasher relay with an electronic LED flasher relay fixes hyperflashing at the source rather than compensating for it downstream. This is the right starting point for most vehicles.
Total Time: 15-30 minutes Difficulty: Beginner Best For: Vehicles with accessible 2-pin or 3-pin thermal flasher relays
How to Locate and Replace a 2-Pin Thermal Flasher Relay
- Consult your vehicle's owner manual or wiring diagram to locate the flasher relay, typically in the fuse box under the dashboard, behind the steering column, or in the engine bay.
- With ignition off and negative battery terminal disconnected, pull the existing relay straight out.
- Note the pin configuration: 2-pin relays are most common in older vehicles; 3-pin relays appear in many 1990s-2000s platforms.
- Install the replacement electronic LED flasher relay. The RMS Lighting LLC 2 Pin Hyper Flash Flasher Fix Turn Signal & Hazard Warn 12V LED Relay with Ground Wire is a direct-fit solution at $10.00.
- Reconnect the battery terminal and test both turn signals and hazards.
Expected Result: Turn signals blink at normal OEM rate with no dashboard warning lights.
Choosing the Right Electronic Flasher Relay for Your Vehicle
A standard 2-pin electronic relay works for most classic and older domestic vehicles. For fine-tuned control, the RMS Lighting LLC 2-Pin Speed Adjustable LED Flasher Turn Signal Relay at $8.00 lets you dial in exact flash frequency. For heavy-duty applications, the 2 Pin Flasher 20A 12V LED Flasher Relay at $8.00 handles higher amperage loads.
Method 2: LED Turn Signal Resistor Installation
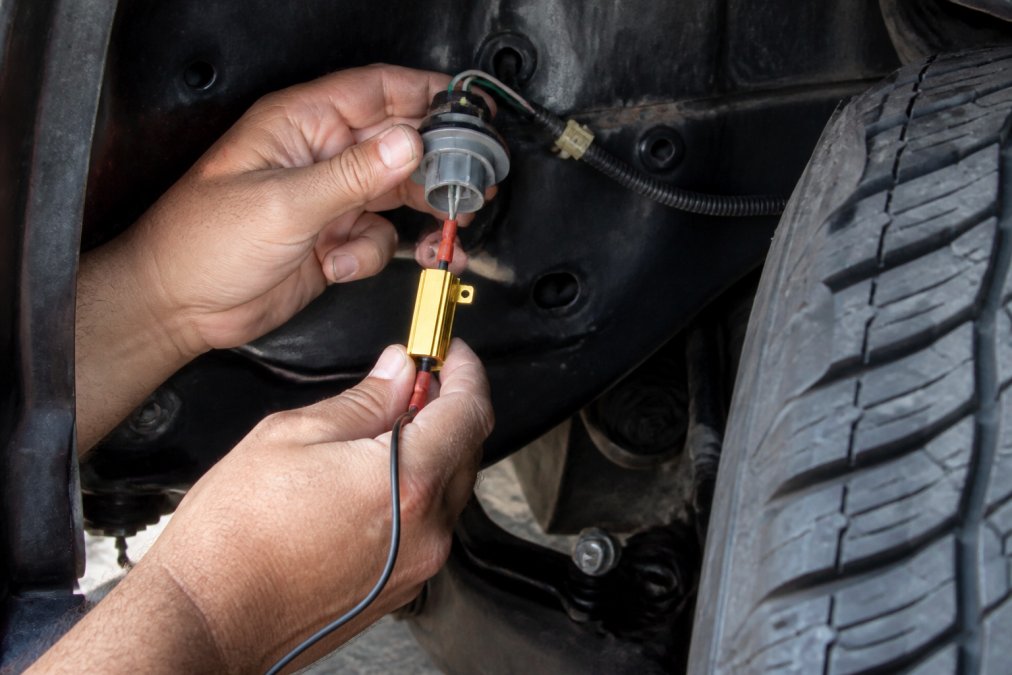
Load resistors work reliably when installed correctly. The principle: add resistance back into the circuit to simulate the load of an incandescent bulb, so the flasher relay behaves normally.
How to Identify the Correct Resistor Size
Most standard turn signal bulbs are 21-watt incandescent units. A common specification is a 6-ohm, 50-watt resistor, which draws approximately 2 amps at 12V, closely mimicking a 21W incandescent bulb's load.
Installation steps:
- Identify positive and negative wires at the bulb socket using a multimeter
- Connect the resistor in parallel across those two wires
- Splice using crimp connectors or solder and heat-shrink tubing
- Mount the resistor body to a metal surface using a self-tapping screw or zip tie
- Test before closing the wheel well
Heat Management and Fire Safety With Load Resistors
Load resistors convert excess electrical load into heat. During normal turn signal use, heat buildup is minimal. Extended hazard light use can push resistor temperatures to dangerous levels.
Mount resistors to bare metal only, never plastic or rubber. Allow at least two inches of clearance from any wiring insulation. If installing in a tight wheel well, use a small aluminum heat sink bracket to spread thermal load. According to NFPA automotive fire safety guidelines, vehicle fires related to aftermarket electrical modifications are documented. Proper heat management prevents this risk.
Method 3: Installing CANbus-Compatible LED Bulbs
Some vehicles monitor turn signal circuits at the ECU level, generating dashboard error codes and triggering hyperflash even with a new flasher relay. CANbus-compatible LED bulbs have built-in resistors and error-suppression circuitry that communicate correctly with a vehicle's Controller Area Network bus, preventing the ECU from flagging low current draw as a fault.
This method is cleanest for 2010s and newer vehicles with fully electronic instrument clusters. It requires no external wiring, no heat management, and no relay replacement in most cases.
The RMS Lighting LLC [BLOWOUT 1157 Canbus Switchback Bulbs](https://rmslighting.net/products/blowout-1157-canbus-switchback-bulbs) at $20.00 are a direct-fit option for 1157 bulb sockets, with error-free non-hyperflash operation built in.
Pros: No external wiring, no heat concerns, eliminates dashboard error codes, plug-and-play installation.
Cons: Higher upfront cost per bulb, requires correct bulb fitment, internal resistors still generate some heat.
Troubleshooting Hyperflashing After Your Fix
If the turn signal still blinks fast after your fix, the cause is usually one of these installation errors:
Mistake 1: Wrong relay pin count. A 2-pin relay in a 3-pin socket won't make proper contact.
Mistake 2: Poor ground wire connection. The electronic flasher relay's ground must connect to clean bare metal, not painted surfaces or rusty brackets.
Mistake 3: Resistor wired in series instead of parallel. This dims the bulb and may damage the LED driver.
Mistake 4: Mixed bulb types in the same circuit. One LED and one incandescent on the same side confuses some flasher relays.
Mistake 5: CANbus bulb in a non-CANbus vehicle. CANbus bulbs in simple thermal flasher circuits occasionally produce erratic behavior.
Legal and Inspection Implications of Non-Standard Blink Rates
Federal Motor Vehicle Safety Standard No. 108 specifies that turn signal lamps must flash at 60-120 flashes per minute. Hyperflashing exceeds this range and fails vehicle safety inspections in most states. As documented in FMVSS 108 lamp standards, this specification applies to all vehicles on public roads regardless of bulb type. A properly fixed LED conversion with normal blink rate avoids inspection failures and potential insurance complications.
Which Method Should You Use to Fix Hyperflashing Turn Signals?
Choose flasher relay replacement if:
- Your vehicle uses a 2-pin or 3-pin thermal flasher relay
- You're converting all turn signal bulbs to LED simultaneously
- Your vehicle doesn't have ECU-monitored lighting circuits
Choose load resistors if:
- Your vehicle uses an electronic flasher relay that can't be swapped
- You're only converting one or two bulbs while others remain incandescent
- You need a solution without relay access
Choose CANbus-compatible bulbs if:
- Your vehicle is 2010 model year or newer with electronic instrument clusters
- You're getting dashboard warning lights alongside fast blinking
- You want a plug-and-play fix with no additional wiring
Most classic car and truck owners will find flasher relay replacement is the cleanest and most permanent solution. RMS Lighting LLC relay options at $8.00-$10.00 make this the most cost-effective fix. For CANbus-equipped modern vehicles, skip the relay and go straight to error-free bulbs.
Hyperflashing is solvable without advanced electrical knowledge. The challenge is matching the right method to your vehicle and circuit type. RMS Lighting LLC offers rigorously tested LED flasher relays and CANbus-compatible bulbs designed as direct replacements for factory components. Explore the RMS Lighting LLC turn signal solutions and get a clean, code-free LED conversion that passes inspection and looks right from every angle.
Frequently Asked Questions
What causes hyperflashing in turn signals?
Hyperflashing happens when you install LED turn signal bulbs to replace incandescent ones. Your vehicle's thermal flasher relay monitors current draw to detect a burned-out bulb. Because LED bulbs draw far less amperage than the OEM bulbs they replace, the relay interprets the low current as a failure and speeds up the blink rate. The result is a rapid, fast-blinking indicator that flashes well above the normal 60-120 bpm range.
Do I need a load resistor for LED turn signals, or will a flasher relay work?
Both methods fix hyperflashing, but they work differently. A load resistor wired in parallel across each bulb socket mimics the resistance of the original incandescent bulb, fooling the circuit into reading normal current draw. Replacing the thermal flasher relay with an electronic LED flasher relay fixes the root cause at the circuit level without adding heat-generating resistors. For most vehicles, the relay swap is the cleaner, lower-maintenance solution for LED turn signal conversion.
Can a bad or incompatible flasher relay cause hyperflashing?
Yes. The factory thermal flasher relay is designed to operate within a specific current draw range tied to incandescent bulbs. When LED bulbs are installed, the reduced amperage causes the thermal element inside the relay to cycle faster than normal, producing the hyperflash effect. Swapping in an electronic flasher relay rated for LED lighting corrects this by using a timer-based circuit rather than a heat-dependent one, regardless of the bulb's current draw.
Is hyperflashing illegal, and will it cause my car to fail inspection?
Federal Motor Vehicle Safety Standard (FMVSS) No. 108 specifies that turn signal flash rates must fall between 60 and 120 flashes per minute. Hyperflashing typically exceeds this range, which can result in a failed state safety inspection and, in some states, a fix-it ticket if an officer notices it. Correcting hyperflashing with a proper LED flasher relay or correctly sized load resistors brings your blink rate back into the legal range before your next inspection.
Will hyperflashing damage my vehicle's wiring or electronics?
Hyperflashing itself is unlikely to cause immediate wiring damage, but it is a symptom worth fixing promptly. The faster cycling can put additional stress on the flasher relay over time, potentially shortening its service life. More importantly, if you use load resistors to fix hyperflashing and mount them incorrectly without a proper heat sink, the heat they generate can melt nearby wiring insulation or plastic components. Always secure resistors to a metal surface away from the wiring harness.
How do I know which LED flasher relay fits my vehicle?
Start by identifying your existing flasher relay's pin count, most older American vehicles use a 2-pin or 3-pin unit. Check your owner's manual or the fuse box cover for the flasher relay location and part number. A 2-pin electronic LED flasher relay from RMS Lighting fits many common applications and is available in a speed-adjustable version for fine-tuning your blink rate. Always confirm the voltage rating (12V for standard passenger vehicles) and amperage capacity before purchasing.
This article was written using GrandRanker