



LED Headlight Conversion Kit Installation Guide

Table of Contents
- What You Need Before Installing an LED Headlight Conversion Kit
- Best Tools for Automotive Lighting Upgrades
- Safety Precautions and Battery Disconnection
- Step-by-Step LED Headlight Conversion Kit Installation
- How to Aim LED Headlights for Proper Beam Pattern
- Troubleshooting LED Headlight Flicker Issues
- Common Mistakes to Avoid During Installation
- Conclusion
Last Updated: August 9, 2026
What You Need Before Installing an LED Headlight Conversion Kit
Installing an LED headlight conversion kit requires careful preparation. You'll need the right tools, materials, and knowledge of your vehicle's specific headlight configuration. At RMS Lighting LLC, the difference between a smooth installation and a frustrating one almost always comes down to preparation.
The LED headlight conversion kit you choose must match your vehicle's headlight housing type and socket configuration. Most modern vehicles use H4, H7, or H11 sockets, while classic cars and trucks often feature sealed beam designs with 5.75-inch, 4x6-inch, or 7-inch round housings. Identifying your exact bulb type before purchasing ensures compatibility and prevents costly mistakes.

Tools and Materials Required
You'll need basic automotive tools: a socket set (10mm, 12mm, and 13mm sockets), a screwdriver set with Phillips and flathead options, needle-nose pliers, and a trim removal tool to prevent damage to plastic clips. An electrical multimeter helps verify proper voltage and polarity when connecting the ballast and driver module.
Gather these materials before starting: the LED headlight conversion kit itself (including LED bulbs, ballast, and wiring harness), electrical tape or heat shrink tubing, and a clean microfiber cloth for handling bulbs. A small container for fasteners prevents losing clips during reassembly. A headlight aiming tool prevents beam pattern misalignment after installation.
Identifying Your Headlight Bulb Type and Socket
Your vehicle's headlight socket type determines which conversion kit works. H4 sockets (common in older vehicles and imports) contain both high and low beam elements in a single bulb. H7 sockets (frequent in European vehicles) handle only low beams. H11 sockets appear in many modern North American vehicles. Classic sealed beam headlights require complete housing replacement rather than simple bulb swaps.
Check your vehicle's owner manual or use an online database to confirm your exact socket type. Look inside the headlight housing with a flashlight, the socket connector shape is visible without disassembly. Many auto parts retailers can identify your bulb type from your vehicle's year, make, and model.
Best Tools for Automotive Lighting Upgrades
The right tools transform an LED headlight conversion kit installation from a three-hour struggle into a straightforward process. A quality socket set with metric and standard sizes covers nearly every fastener you'll encounter. Needle-nose pliers excel at manipulating electrical connectors and removing factory clip fasteners without damage. A trim removal tool prevents cracking plastic bezels surrounding your headlight housing.
An electrical multimeter becomes essential when troubleshooting CANBUS errors or verifying ballast voltage output. A headlight aiming tool (available for under $30) ensures your LED conversion kit produces proper beam pattern alignment. Improper aiming creates dangerous glare for oncoming drivers and reduces your own visibility.
Investing in a basic automotive electrical kit that includes wire strippers, crimpers, and a selection of connectors can enable proper wiring harness connections that resist corrosion and electrical failure. Many DIY installations fail not because the LED headlight conversion kit is defective, but because hastily-soldered or poorly-crimped connections degrade over months of vibration and temperature cycling.
Safety Precautions and Battery Disconnection
Always disconnect your vehicle's negative battery terminal before beginning any electrical work. This single step prevents accidental short circuits that damage your LED headlight conversion kit's ballast and driver module. Battery disconnection takes 30 seconds and eliminates the risk of electrical shock or component damage.
Allow the headlight bulbs and housing to cool completely before touching them. Factory halogen bulbs reach temperatures exceeding 500°F during operation. Wait at least 15 minutes after turning off your headlights before beginning disassembly.
Wear safety glasses throughout the installation process. Plastic trim clips, small fasteners, and dust particles can become projectiles when working in tight spaces. Mechanic's gloves protect your hands from sharp edges and prevent skin oils from transferring to new LED bulbs (oils cause premature bulb failure).
Work in a well-lit area with the vehicle parked on level ground and the parking brake engaged. Never work under a vehicle supported only by a jack. Use jack stands rated for your vehicle's weight if you need to access the headlight from underneath.
Step-by-Step LED Headlight Conversion Kit Installation
Accessing the Headlight Housing
Most vehicles require removal of the front bumper cover or wheel well liner to access the headlight housing from behind. Consult your vehicle's service manual for the specific procedure, as access points vary significantly between manufacturers. Use your trim removal tool to release plastic clips holding the bumper cover, working slowly to avoid cracking fasteners.
Once you've accessed the rear of the headlight housing, locate the three or four fastening bolts that secure the assembly. These bolts are typically 10mm, 12mm, or 13mm. Remove these fasteners completely and set them aside. Gently pull the headlight housing forward; it may have an electrical connector for the factory bulb socket that requires disconnection before full removal.
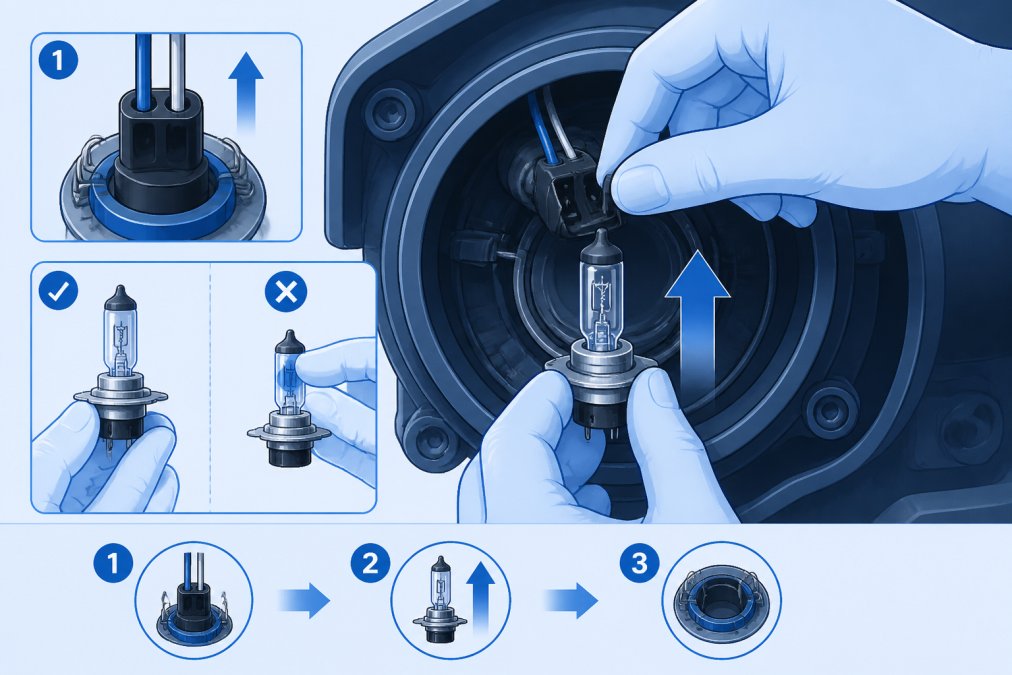
Removing the Factory Halogen Bulb
The factory halogen bulb twists counterclockwise from its socket. Grip the bulb's base firmly (not the glass portion) and rotate it slowly. Continue rotating until the bulb stops, then pull it straight out. Never force the bulb; excessive force cracks the socket connector.
Inspect the socket for corrosion or moisture. If you find white or blue oxidation on the metal contacts, clean them gently with a small wire brush or fine sandpaper. Moisture inside the housing indicates a seal failure that should be addressed before installing your LED headlight conversion kit.
Installing the LED Bulb and Connecting the Ballast
Your LED headlight conversion kit's bulb inserts into the socket straight in, then rotated clockwise until it seats fully. The bulb's connector should align with the socket's shape; forcing a misaligned connector damages both components. Once the bulb is seated, connect the ballast and driver module according to your kit's wiring diagram.
The ballast unit mounts securely away from heat sources, typically inside the engine bay near the headlight housing using the provided mounting bracket. Ensure the ballast has clearance from moving engine components, exhaust manifolds, and other heat sources. The driver module connects between the vehicle's electrical system and the ballast. Follow your LED headlight conversion kit's wiring diagram precisely. Use a multimeter to verify correct voltage output from the driver before considering the installation complete.
Managing Wiring, Dust Covers, and Electrical Connectors
Secure all wiring with cable ties or clips to prevent vibration-induced chafing against engine components. Route wires away from moving parts like belts and pulleys. Most vehicles have existing wire management clips in the engine bay; use these to keep your LED headlight conversion kit's wiring organized and protected.
Install the dust cover (included with most conversion kits) over the rear of the headlight housing. This rubber or silicone seal prevents moisture, dust, and debris from entering the housing and corroding the bulb contacts. A missing or improperly seated dust cover is the leading cause of moisture-related electrical failures in LED installations.
Electrical connectors must be clean and tight. Ensure full insertion and a secure click. Loose connectors create intermittent electrical contact that causes flickering and reduces light output. A small dab of dielectric grease (included in quality kits) on connector pins prevents corrosion and improves electrical reliability.
How to Aim LED Headlights for Proper Beam Pattern
LED bulbs produce significantly different beam patterns than factory halogen bulbs, and improper aiming creates dangerous glare for oncoming drivers while reducing your own visibility. The factory headlight housing aiming mechanism (typically a screw or bolt behind the housing) adjusts the beam's vertical and horizontal position. Aim your LED headlight conversion kit on a flat wall or garage door at night, with your vehicle parked 25 feet away on level ground.
Turn on your low beams and observe where the light hits the wall. The beam should form a clear cutoff line, with the upper portion dropping off sharply to avoid blinding oncoming traffic. The bright center of the beam should point slightly downward and toward the right side of your lane (in the United States). Many LED headlight conversion kits include detailed aiming instructions specific to their design; follow these carefully.
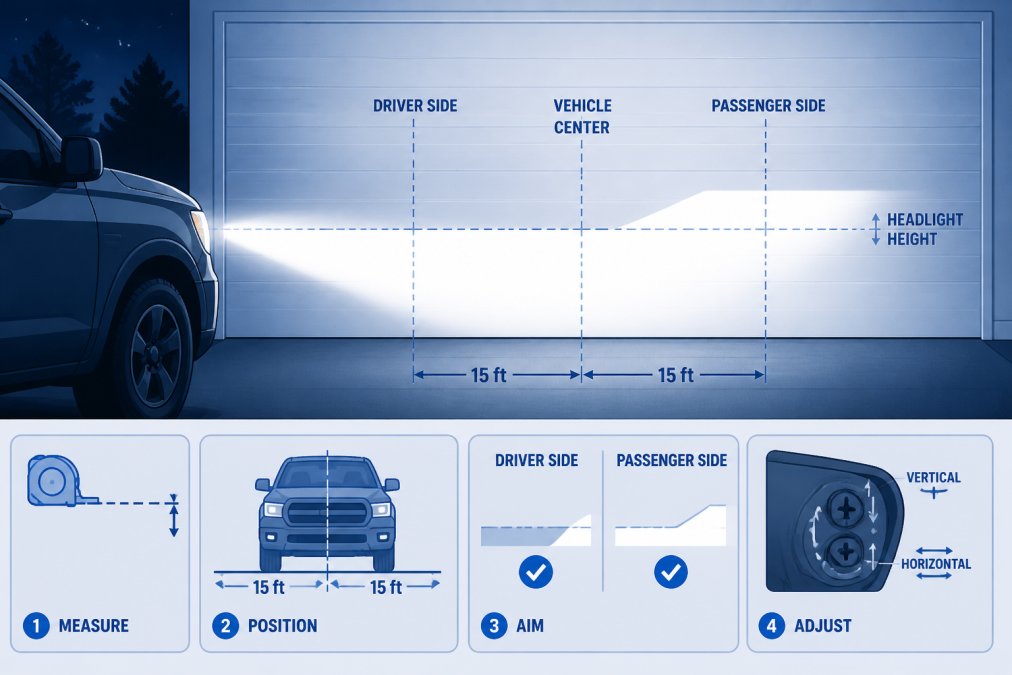
Adjust the aiming screws in small increments; quarter-turn adjustments are typical. Recheck the beam pattern after each adjustment. Proper aiming prevents the common mistake of creating a light pattern that blinds oncoming drivers or leaves dark spots in your field of view.
Troubleshooting LED Headlight Flicker Issues
LED headlight flicker typically stems from CANBUS compatibility problems. Modern vehicles use CANBUS electrical systems that monitor bulb resistance and power draw. Factory halogen bulbs have specific electrical characteristics that CANBUS systems expect. When you install an LED headlight conversion kit, the lower power draw and different resistance values can trigger dashboard warning codes and cause flickering.
Quality LED headlight conversion kits include CANBUS-compatible ballasts that mimic factory bulb electrical characteristics. If you experience flickering after installation, first verify that all electrical connections are tight. Loose connectors create intermittent power delivery that appears as flicker even when the LED bulb itself functions correctly.
PWM (pulse width modulation) flicker sometimes occurs when your vehicle's electrical system regulates power to the headlights. Some LED headlight conversion kits include PWM-compatible drivers that synchronize with your vehicle's power regulation system. If flicker persists despite tight connections and CANBUS-compatible ballasts, you may need to upgrade to a PWM-compatible driver module. RMS Lighting LLC's conversion kits are tested for compatibility with common vehicle electrical systems to minimize these issues.
Dashboard warning codes indicate electrical system problems that require diagnosis. A multimeter helps identify voltage irregularities or ground connection failures. Many flickering issues trace to poor ground connections; the negative wire from the ballast must connect securely to a clean metal surface on your vehicle's chassis. Corrosion or paint on the ground connection point prevents proper electrical flow and causes flickering and error codes.
Common Mistakes to Avoid During Installation
Forcing components into place ranks among the most destructive mistakes during LED headlight conversion kit installation. Headlight sockets, connectors, and housing fasteners have specific alignment requirements. Take time to align components before applying pressure.
Installing the LED bulb before the housing is fully secured often causes the bulb to shift during final assembly. Complete all housing assembly and fastening before inserting the LED bulb.
Neglecting to verify proper polarity before final assembly creates expensive problems. Reversed positive and negative connections damage the driver module and prevent the bulb from illuminating. Use a multimeter to confirm correct voltage polarity at the driver module connector before considering the installation complete.
Skipping the dust cover installation or failing to seat it properly allows moisture into the housing. Moisture causes corrosion that degrades electrical connections and creates the intermittent failures that frustrate drivers months after installation.
Over-tightening fasteners cracks plastic housing components and strips threads. Hand-tighten fasteners first, then use a socket wrench to snug them firmly, not with maximum force.
| Mistake | Prevention | Impact |
|---|---|---|
| Forcing misaligned components | Verify alignment before applying pressure | Damaged sockets and connectors |
| Installing bulb before housing is secured | Complete housing assembly first | Bulb shifts and cracks during final fastening |
| Reversed polarity connections | Use multimeter to verify voltage | Driver module damage, no illumination |
| Missing dust cover | Install included dust seal properly | Moisture intrusion and corrosion |
| Over-tightening fasteners | Hand-tighten, then snug with wrench | Cracked housing and stripped threads |
LED headlight conversion kits deliver superior visibility and modern styling for vehicles with aging factory lighting. The installation process demands attention to detail but remains accessible to DIY enthusiasts with basic automotive experience. RMS Lighting LLC offers rigorously tested LED headlight conversion kits designed for straightforward installation, including CANBUS-compatible ballasts and comprehensive wiring harnesses that minimize troubleshooting. Our conversion kits feature correct LHD lens patterns and deliver the improved visibility and vibrant illumination that transform your driving experience. Get started with RMS Lighting LLC and upgrade your vehicle's lighting to the precision-engineered standards that modern driving demands.
Frequently Asked Questions
What tools do I need to install an LED headlight conversion kit?
Most LED headlight conversion kits require basic hand tools: a socket set, screwdrivers (Phillips and flathead), a wire stripper, electrical tape, and a multimeter for testing polarity. You'll also need a 12V power supply or your vehicle's battery to test the ballast and driver module before final installation. Depending on your vehicle's design, you may need a trim panel removal tool to access the headlight housing safely without damaging clips or fasteners.
Why are my LED headlights flickering after installation?
LED headlight flicker issues typically stem from CANBUS compatibility problems, incorrect polarity on electrical connectors, or a loose wiring harness connection. Modern vehicles use CANBUS systems that monitor bulb resistance; LED bulbs have different resistance than halogen bulbs, triggering error codes and flickering. Many RMS Lighting conversion kits include ballasts with CANBUS error-cancellation technology to prevent this. If flickering persists, verify all connections are tight, check that the ballast is fully seated, and confirm your vehicle's year and model matches the kit specifications.
How do I aim LED headlights after installation to avoid blinding other drivers?
After installing your LED conversion kit, park your vehicle 25 feet from a wall or garage door in a dark environment. Turn on the headlights and observe the beam pattern projection. The cutoff line (where light meets shadow) should be horizontal or slightly below the center of the wall, with no upward scatter that could blind oncoming traffic. Most vehicles have horizontal and vertical adjustment screws on the back of the headlight housing. Adjust slowly, rechecking the beam pattern after each turn. Proper beam pattern alignment ensures you get maximum visibility while maintaining safe lighting for other drivers.
Will an LED headlight conversion kit work in my older vehicle's factory headlight housing?
Yes, sealed beam LED conversion kits are designed to replace factory halogen bulbs in original housings without modification. RMS Lighting offers conversion kits in multiple sizes (5.75", 4x6, 5x7, and 7") to match common factory configurations. However, verify your vehicle's headlight socket type (H4, H7, 9005, etc.) and housing dimensions before purchasing. Older vehicles with original sealed beam housings are ideal candidates for conversion kits because the glass optics are already proven to work correctly. Modern vehicles with projector housings may have different requirements, so confirm compatibility with your specific year, make, and model.
This article was written using GrandRanker