



Preventing Hyper Flash With LED Bulbs: A Complete Fix Guide

Table of Contents
- What Is Hyper Flash and Why LED Bulbs Cause It
- LED Load Resistor Installation: Step-by-Step
- LED Flasher Relay Replacement: The Direct Fix
- CANbus and Error-Free LED Bulbs
- Comparing Your Options: Pros and Cons
- Heat Management and Electrical Safety
- Legal Compliance and Inspection Requirements
- Troubleshooting Hyper Flash After Your Fix
Last Updated: August 6, 2026
What Is Hyper Flash and Why LED Bulbs Cause It
Hyper flash occurs when your turn signal blinks abnormally fast, sometimes twice the normal speed, after installing LED bulbs in a vehicle designed for halogen lights. This happens because your vehicle's electrical system wasn't engineered to handle the lower power draw of LEDs. Understanding this is the first step toward preventing hyper flash and keeping your turn signals functioning safely.

How Your Turn Signal Relay Works
Your turn signal system relies on an electromechanical relay that controls current flow to your lights. Traditional halogen bulbs draw significant electrical current, typically 10-27 watts per bulb. The relay is calibrated to detect this specific load and uses it to time the on-off blinking cycle.
When current flows at the expected level, the relay's internal heating element reaches a certain temperature, triggering a bimetallic strip to bend and open-close the circuit at a consistent rate, usually 60-120 blinks per minute. The relay is tuned to this specific electrical load. Remove that load, and the relay loses its calibration.
Why LEDs Trigger Fast Blinking
LED bulbs consume far less power than halogen equivalents, often 3-8 watts instead of 20 watts. When you swap halogen bulbs for LEDs without upgrading your relay or adding load resistors, the electrical current drops dramatically. Your original relay no longer "feels" the expected load.
With insufficient current flowing, the relay's internal heating element cools faster, and the bimetallic strip cycles more rapidly. The result is hyper flash, your turn signals blink two, three, or even four times faster than normal. This is a mechanical artifact of older relay design. Many vehicles from the 1990s and 2000s still use these simple electromechanical relays. Newer vehicles with CANbus electrical systems detect bulb changes differently and often don't hyper flash.
National Highway Traffic Safety Administration guidance on vehicle lighting standards
LED Load Resistor Installation: Step-by-Step
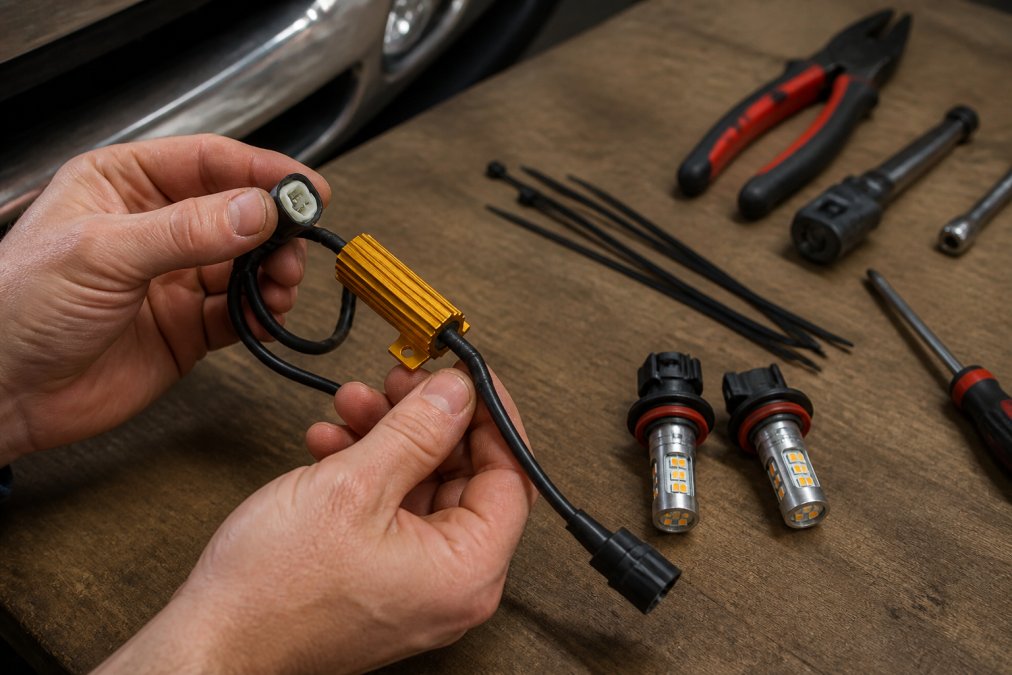
An LED load resistor solves hyper flash by mimicking the electrical load of a halogen bulb. The resistor dissipates excess electrical energy as heat, creating the same current draw your relay expects. This method is affordable and doesn't require replacing your relay.
What You'll Need Before Starting
Gather these components:
- LED load resistors (typically 50-watt or 100-watt rating)
- In-line resistor harnesses with pre-crimped connectors
- Wire strippers and crimpers
- Electrical tape or heat shrink tubing
- A multimeter (optional)
- Flashlight or work light
- Basic socket set for dashboard removal
- Your vehicle's wiring diagram
Most modern LED load resistors come as plug-and-play in-line harnesses. RMS Lighting LLC offers pre-assembled LED flasher solutions designed to work with standard automotive wiring, making installation straightforward for DIY enthusiasts.

Installing In-Line Resistors
Step 1: Disconnect the battery negative terminal. This prevents electrical shocks and protects your vehicle's electronics. Wait 30 seconds after disconnecting to allow residual charge to dissipate.
Step 2: Locate your turn signal bulb socket. Consult your vehicle's manual for the exact location. Most vehicles have turn signal bulbs at the front and rear corners.
Step 3: Remove the factory halogen bulb and socket. Turn the socket counterclockwise and pull it straight out. Document this process with photos for easier reassembly.
Step 4: Insert the LED bulb into the socket. Don't install the socket back into the housing yet.
Step 5: Route the load resistor harness. The resistor needs to be positioned where it can dissipate heat safely. Common mounting locations include behind the bumper, inside the fender, or along the frame rail. Avoid areas prone to moisture. Secure the resistor with a zip tie or bracket.
Step 6: Connect the resistor harness to your vehicle's wiring. Most in-line resistors use a three-wire connection: power (usually red), ground (usually black), and signal (usually yellow or white). Use crimp connectors rated for automotive use.
Step 7: Reconnect the battery and test. Turn on your turn signals and confirm normal blinking speed. The blink rate should return to 60-120 cycles per minute.
Common Installation Mistakes to Avoid
The most frequent mistake is mismatching the resistor rating to your LED bulb wattage. A 50-watt resistor designed for standard-draw LEDs won't provide enough load for high-intensity LEDs. Check your bulb specifications and match the resistor accordingly.
Another common error is poor grounding. Resistors rely on solid ground connections to function. Use new crimp connectors and apply dielectric grease to prevent oxidation.
Placement matters significantly. Resistors generate heat, sometimes 150-200 degrees Fahrenheit under sustained use. Never mount a resistor directly against plastic trim, wiring harnesses, or fuel lines. Position resistors where air can circulate freely.
Finally, don't assume one resistor per side is sufficient if you're converting both turn signal and parking light functions. Each circuit may need its own resistor.
LED Flasher Relay Replacement: The Direct Fix
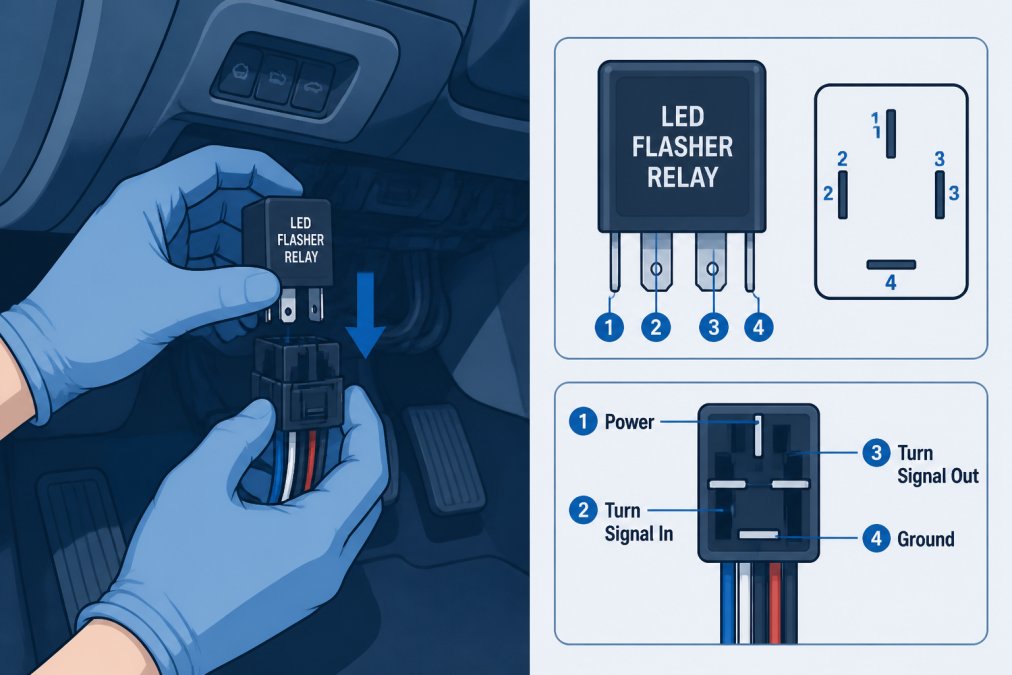
Replacing your turn signal relay with an LED-specific relay is the most direct solution for preventing hyper flash. Unlike load resistors, an LED flasher relay is engineered to handle the lower current draw of LED bulbs. This method eliminates hyper flash without adding external components.
How an LED-Specific Relay Solves Hyper Flash
An LED flasher relay uses electronic circuitry instead of a mechanical bimetallic strip. It measures current flow and adjusts its timing electronically to maintain the correct blink rate regardless of the load. Whether your bulbs draw 5 watts or 20 watts, the relay blinks at the same speed.
This approach has several advantages: it's a permanent fix requiring no additional resistors, occupies minimal space, generates no heat, and works with any LED bulb wattage. Many LED flasher relays are also speed-adjustable, allowing you to customize your turn signal blink rate from 60 to 120 cycles per minute.
RMS Lighting LLC offers 2-Pin Hyper Flash Flasher relays specifically engineered to fix turn signal and hazard warning hyper flash on 12V systems. These relays include a ground wire for secure installation and are compatible with most vehicles manufactured before 2010.
Locating and Replacing Your Flasher Relay
Your turn signal relay is typically located under the dashboard near the steering column, though some vehicles mount it in the engine bay fuse box. Consult your vehicle's service manual for relay location diagrams specific to your make and model year.
Step 1: Disconnect the battery negative terminal and wait 30 seconds.
Step 2: Locate the relay socket. It's usually a plastic housing with 2, 3, or 4 pins. Your manual will identify which relay controls turn signals.
Step 3: Pull the relay straight out. Some relays require slight rocking motions to dislodge.
Step 4: Note the pin configuration. Match this configuration to your replacement relay. Pins must align exactly for the relay to function.
Step 5: Insert the new LED flasher relay. Push it firmly into the socket until it seats completely.
Step 6: Reconnect the battery and test. Turn on your turn signals and verify normal blinking speed.
CANbus and Error-Free LED Bulbs
Modern vehicles with CANbus electrical systems handle LED bulbs differently than older vehicles. These systems use a data network to monitor electrical components rather than relying on simple current draw. They detect when a bulb fails or is missing by monitoring actual light output, not electrical load.
Some LED bulbs are designed as "CANbus-compatible" or "error-free" bulbs. These include built-in resistors or capacitors that prevent dashboard error codes and hyper flash on CANbus systems. If your vehicle has a CANbus system and you're experiencing hyper flash, a CANbus-compatible LED bulb may solve the problem without additional installation steps.
RMS Lighting LLC offers 1157 CANbus Switchback bulbs engineered to eliminate error codes and hyper flash on vehicles with advanced electrical systems. However, CANbus compatibility varies widely between manufacturers and vehicle models. Test your specific bulb on your specific vehicle before assuming it will work error-free.

Comparing Your Options: Pros and Cons
| Solution | Pros | Cons | Best For |
|---|---|---|---|
| Load Resistors | Affordable ($15-30), no relay removal needed, works on all vehicles | Generates heat, requires routing, multiple resistors may be needed | Budget-conscious DIY installers, vehicles with difficult relay access |
| LED Flasher Relay | Permanent fix, no heat generation, compact, speed-adjustable options available | Requires relay location and removal, slightly higher cost ($8-15) | Most vehicle owners, those wanting simplicity |
| CANbus LED Bulbs | No additional components, cleanest install, solves error codes | Higher bulb cost ($20-40), compatibility varies by vehicle | Modern vehicles with CANbus systems, those wanting plug-and-play |
| Combination (Relay + Bulbs) | Most reliable, future-proof, handles all scenarios | Highest total cost, may be overkill for simple conversions | Builders and restorers prioritizing reliability |
Load resistors are the traditional workaround, inexpensive and universally compatible but requiring careful heat management. LED flasher relays are simpler and more elegant, one relay replaces your factory relay and handles all turn signal circuits simultaneously. CANbus bulbs offer the cleanest installation on compatible vehicles but at a higher per-bulb cost.
Heat Management and Electrical Safety
Load resistors dissipate significant heat during operation. A 50-watt resistor running continuously can reach 150-200 degrees Fahrenheit. This heat must be managed safely to prevent fires or damage to nearby components.
Never mount a resistor directly against plastic trim, fuel lines, brake lines, or electrical harnesses. Position resistors in open areas where air can circulate freely, behind bumpers, inside wheel wells, or along frame rails are typical safe locations. Secure resistors with metal brackets or high-temperature zip ties.
Inspect your resistor installation monthly during the first few weeks of operation. The resistor should be warm but not too hot to touch for more than a few seconds. If it's extremely hot or if you notice melted plastic nearby, relocate the resistor immediately.
LED flasher relays generate minimal heat and don't require special thermal management.
Legal Compliance and Inspection Requirements
Turn signal specifications are governed by Federal Motor Vehicle Safety Standard 108 (FMVSS 108). Turn signals must blink between 60 and 120 times per minute. Hyper-flashing turn signals that blink faster than 120 cycles per minute may fail vehicle inspections in some states.
Before installing LED turn signals, verify that your chosen bulbs meet FMVSS 108 standards. Reputable manufacturers like RMS Lighting LLC test their products against these standards. Cheap, untested LED bulbs from unknown sellers frequently fail to meet specifications.
To verify your turn signal blink rate: count the number of blinks in 10 seconds, divide by 10 to get blinks per second, then multiply by 60 to get cycles per minute. The result should be between 60 and 120.
Federal Motor Vehicle Safety Standard 108 specifications
Troubleshooting Hyper Flash After Your Fix
After installing a load resistor or LED flasher relay, hyper flash should disappear immediately. If it persists, diagnose the problem systematically.
Hyper flash continues after relay replacement: Verify you installed the correct relay type and that it's fully seated in the socket. Check that the relay pins align with the socket. Some vehicles have multiple flasher relays; confirm you replaced the turn signal relay, not the hazard flasher.
Hyper flash on one side only: If only the left or right turn signal hyper flashes, you may have a bulb compatibility issue on that side. Verify both bulbs are the same type and wattage. Mismatched bulbs cause uneven electrical loads.
Hyper flash after load resistor installation: Check all wire connections for corrosion or loose crimps. A poor ground connection prevents the resistor from functioning. Verify the resistor rating matches your LED bulb wattage.
Turn signals don't blink at all: Check that the LED bulb is installed correctly and making good contact with the socket. Verify your relay or resistor is properly connected. Use a multimeter to test for voltage at the bulb socket when the turn signal is activated.
Dashboard error codes after LED installation: Use CANbus-compatible LED bulbs designed for your vehicle. If error codes persist, you may need a relay designed for your specific vehicle's electrical system.
Preventing hyper flash with LED bulbs is straightforward once you understand the root cause. Your vehicle's turn signal relay was engineered for halogen bulbs, a specific electrical load that LEDs don't provide. Whether you choose load resistors, an LED flasher relay, or CANbus-compatible bulbs, the solution restores normal blinking and keeps your turn signals street-legal.
At RMS Lighting LLC, we've engineered LED flasher relays and CANbus bulbs specifically to eliminate these compatibility issues. Our 2-Pin Speed Adjustable LED Flasher relay provides a permanent fix for $8, and our CANbus Switchback bulbs handle modern vehicles without additional components. Start with the right solution from the beginning, and you'll enjoy reliable LED lighting without the frustration of hyper flash.
Frequently Asked Questions
Why do LED bulbs cause hyper flash in turn signals?
LED bulbs draw far less electrical current than original halogen bulbs. Your vehicle's flasher relay is calibrated to detect a specific electrical load. When it senses the lower current draw from LEDs, it interprets this as a bulb-out condition and speeds up the blink rate to alert you. This fast blinking is hyper flash. Traditional relays cannot distinguish between a failed bulb and efficient LEDs, so they trigger the warning pattern automatically.
What's the difference between a load resistor and an LED flasher relay?
A load resistor mimics the electrical resistance of a halogen bulb, fooling your existing relay into thinking it still has the original bulb installed. An LED flasher relay is specifically designed to recognize the lower current draw of LEDs and blink at the normal rate without resistance. Load resistors work but generate heat; flasher relays are cleaner and more efficient. Some vehicles need both solutions depending on wiring complexity.
Do I need a load resistor for every LED turn signal bulb?
Not necessarily. If you upgrade to CANbus or error-free LED bulbs, they're designed to prevent hyper flash without additional components. For standard LED bulbs on older vehicles without CANbus wiring, you typically need one load resistor per bulb circuit. Check your vehicle's wiring diagram and the LED bulb specifications to confirm. Some vehicles require resistors on both sides of the turn signal circuit; others need them only on one side.
Is hyper flash illegal in the United States?
Hyper flash itself is not explicitly illegal, but it can trigger roadside safety inspections and fail vehicle inspections in some states if the turn signal blink rate exceeds Federal Motor Vehicle Safety Standard (FMVSS) 208 specifications, which require 60 to 120 cycles per minute. Most states will not pass a vehicle with visibly abnormal turn signal behavior. Fixing hyper flash ensures compliance and keeps you roadworthy.
This article was written using GrandRanker