



Do LED Headlights Require Special Dust Covers?

Table of Contents
- Why LED Bulbs Need More Room Than Halogen
- LED Headlight Bulb Cooling Requirements Explained
- Do LED Headlights Require Special Dust Covers?
- Extended Rubber Headlight Dust Covers: Types and Fitment
- Headlight Housing Moisture Prevention and Seal Integrity
- How to Measure Your Housing and Choose the Right Cap
- Mistakes to Avoid: Drilling, Sealing, and 3D Printing
- Conclusion
- Frequently Asked Questions
Last Updated: October 3, 2026
Why LED Bulbs Need More Room Than Halogen
A halogen bulb is a glass envelope and a filament that radiates most of its energy away as heat.
Halogen bulbs run hot but tolerate it well. LED bulbs run cooler at the lens yet are far more sensitive to heat at the back, so the diodes need a path to move heat away from the chip.
Both parts take up space.
So the short answer: LED headlights often need more clearance than halogen, and that clearance is exactly what a dust cover can block. At RMS Lighting LLC, we see this fitment issue constantly with older halogen housings.
LED Headlight Bulb Cooling Requirements Explained
LED headlight bulb cooling requirements come down to one rule: heat must leave the housing, or the bulb fades, flickers, or shuts down to protect itself.
Here is what the cooling parts actually do:
- Heat sink pulls heat off the diode board
- Cooling fan pushes air across the sink
- Air circulation carries that heat out of the housing
A sealed housing traps all of it. You want a dust-proof, waterproof seal to keep moisture out, but you also need airflow to keep the bulb alive. Too much seal and the fan just moves hot air in a circle; too little and condensation pours in.
The fix is a cap that seals the housing while letting the bulb breathe and cool. An extension cap moves the seal back so the fan has room to work.
Do LED Headlights Require Special Dust Covers?
Yes, in most cases LED headlights do require special dust covers, or at least an extended cap, when the factory cover cannot clear the new bulb.
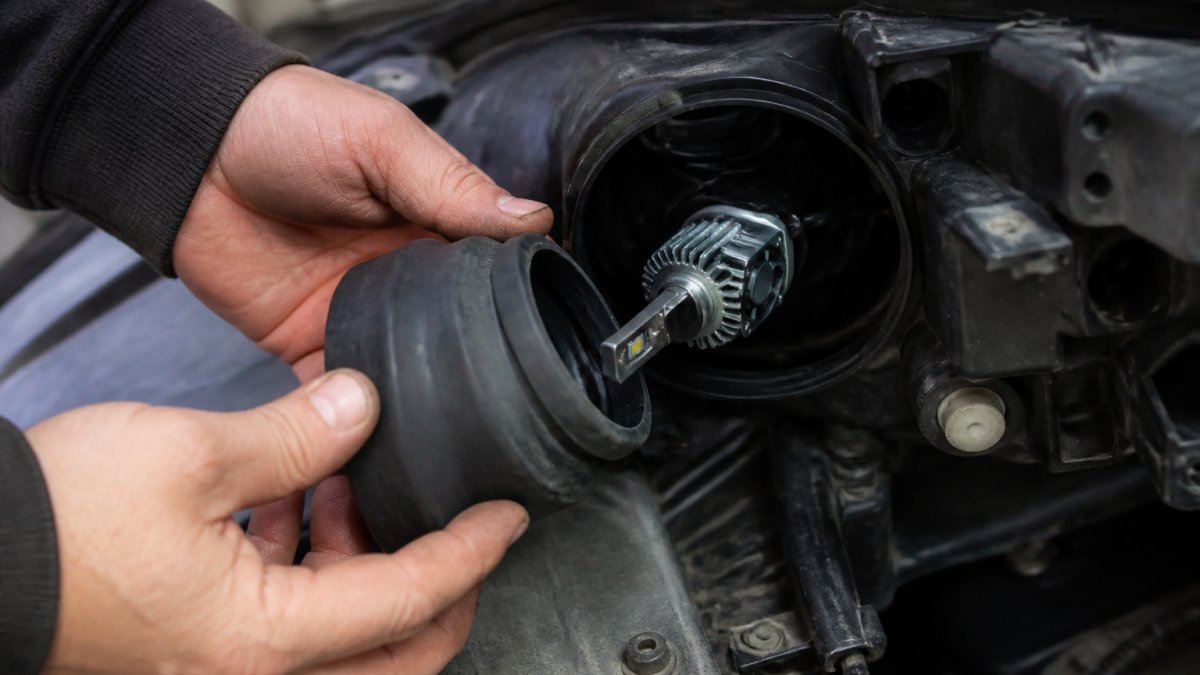
If the factory cap fits over the LED bulb with room to spare, you can often reuse it. If it presses on the fan or sink, you cannot, forcing it on traps heat and kills LED bulbs early.
This is where "special" gets misunderstood. A special dust cover is not a gimmick, it is a deeper cap, usually rubber, that keeps the same seal against the housing while adding depth at the back.
What Happens If You Leave the Dust Cover Off
Running without a dust cover is the fastest way to ruin a headlight assembly. The housing is open to dust, water, and road spray. Moisture ingress follows, then condensation, then corrosion on the reflector.
The damage is not instant, which tricks people. A few weeks without a cap looks fine, then you notice fog inside the lens after a cold morning, by which point moisture has reached the chrome.
So you have two bad options if the stock cap does not fit: leave it off and risk moisture, or force it on and risk heat.
Extended Rubber Headlight Dust Covers: Types and Fitment
Extended rubber headlight dust covers solve the clearance problem by adding depth without breaking the seal, but the type you pick must match how much heat your bulb throws off and how much moisture your housing sees. It is not a simple "buy a deeper cap" decision.
Here is how the common styles actually behave:
- Deep rubber caps (silicone or EPDM): Flex over the fan and heat sink, seal against the housing lip with a gasket, and absorb vibration. Best for most retrofits; silicone handles higher under-hood temperatures than standard rubber, which matters on turbocharged or tightly packed engine bays.
- Vented caps: Include a small breather (often a Gore-style membrane) that lets hot air and pressure escape while blocking liquid water and dust. This is the only style that actively resolves the heat-versus-seal trade-off instead of just moving it.
- Hard plastic extensions: Rigid and stable, good when a soft cap would collapse or rub. They do not flex, so the gasket must be perfect or they leak.
- Universal trim-to-fit boots: Best when no OEM cap matches your housing. You cut the boot to the housing diameter. The risk is a sloppy cut that does not seat evenly.
The Trade-Off Nobody Explains
A dust cover has two jobs that fight each other: keep water, dust, and road spray out, and let the heat your LED bulb generates escape. A cap that only seals cooks the diodes; a cap that only vents fogs the lens.
A vented extension cap is the closest thing to a real solution because it separates the two functions: the rubber body seals against the housing, and the membrane breather handles pressure and heat. If your bulb runs hot and you drive in wet or humid conditions, it is worth the extra cost.
Fitment Specs That Actually Matter
Fitment is where people get burned: two housings can look identical and take different caps. The cap must match the housing diameter, lip shape, and depth behind the bulb.
- Diameter: Measure the opening where the cap seats, not the widest part of the housing. A few millimeters too small and it pops off at speed; too large and it will not seat, causing condensation within days.
- Lip shape: Flat, stepped, or grooved. A flat-lip cap will not seal on a grooved housing no matter how tight you push it.
- Inner depth: The distance from the cap's sealing edge to the inside of the dome. It must clear the back of the fan or heat sink with a gap; if the fan presses flat against the cap, it just recirculates hot air.
- Material temperature rating: Standard rubber can soften and deform in an engine bay that sees sustained high temperatures. Silicone and high-temp EPDM hold their shape.
Do not buy a cap by "close enough" sizing. A cap that is a few millimeters too small will pop off at speed. A cap that is too large will not seat, and you will get condensation within days.
If your bulb kit includes a fan, the cap needs to leave open air behind the fan, not a wall. A vented cap with a membrane breather gives the fan somewhere to push hot air while still blocking water.
Headlight Housing Moisture Prevention and Seal Integrity
Headlight housing moisture prevention depends on one thing: a seal that stays intact. The dust cover is the front line, and a good cap keeps the rubber seal tight against the housing.
But a perfect seal has a downside: heat builds pressure inside the housing, and if it cannot vent, that pressure can push past the seal or crack a lens over time.
This trade-off separates a good retrofit from a bad one.
Check your seal every time you swap a bulb, a gasket that is pinched, dry, or missing will leak. A little silicone grease helps it seat and last.
How to Measure Your Housing and Choose the Right Cap
Getting the right cap starts with two measurements. Skip them and you will guess, and guessing wastes money.
What you'll need:
- A tape measure or calipers
- The LED bulb installed in the housing
- A note of the gap between the bulb back and the housing edge
Steps:
- Measure the housing opening diameter where the cap seats
- Measure the depth from the housing edge to the back of the LED bulb
- Compare that depth to the cap's inner depth
- Check the lip shape: flat, stepped, or grooved
- Match the cap to both the diameter and the depth
If the bulb sits deeper than the stock cap allows, go with an extended cap. If the bulb fits but the fan needs air, go vented.
| Housing Issue | What It Means | Best Fix |
|---|---|---|
| Stock cap presses on fan | No clearance | Extended rubber cap |
| Bulb fits, heat builds | Trapped air | Vented cap |
| Cap will not seat | Wrong diameter | Measure and rematch |
| Fog after rain | Seal failure | New gasket plus cap |
Mistakes to Avoid: Drilling, Sealing, and 3D Printing
The biggest mistake is drilling holes in the factory cap. It seems smart. You get airflow and keep the cap. But you also punch a hole straight through your dust and waterproof barrier.
Sealing mistakes come next. People pack the cap with silicone and glue it shut. That traps heat and pressure, and it makes the next bulb swap a nightmare. Use the gasket, not a tube of sealant.
3D printing is the third trap. A printed cap can work, but only if you get the material and specs right. Standard PLA softens in an engine bay. Use a heat-resistant filament such as PETG, ABS, or ASA.
The Legal and Safety Angle Most Guides Skip
Modifying a headlight housing is not just a fitment question. It is a regulated safety system. Federal Motor Vehicle Safety Standard 108 (FMVSS 108) governs lighting equipment on vehicles sold in the United States, and it sets requirements for headlamp performance, including beam pattern and glare control.
State inspection programs vary. Some states check headlamp aim and function during safety inspections; others do not. But the practical risk is the same: a housing that fogs, corrodes, or throws a scattered beam can fail an inspection or draw unwanted attention from law enforcement.
What This Means for Your Build
- Do not drill the factory cap. Use a vented extension cap instead.
- Do not glue the cap shut. Use the gasket and a breather membrane.
- If you 3D print, use a heat-resistant filament and match the gasket groove to the housing lip.
- Keep the beam pattern intact. The dust cover should not change how the bulb sits in the housing.
A dust cover has to do two jobs at once: keep water out and let heat out. Any fix that only does one of those will cost you a bulb or a housing. And any fix that changes the housing geometry can affect whether your headlamps stay compliant with federal lighting standards.
Conclusion
The real challenge with LED retrofits is balancing cooling and sealing, and the dust cover sits right in the middle of that fight. Get it wrong and you either cook the bulb or flood the housing.
At RMS Lighting LLC, we build our LED headlamp conversion kits and bulbs to replace factory components with ease, backed by research and testing. Our kits cover many vehicles, and you can step up to 90-Watt or 130-Watt bulbs when you need more output.
Get started with RMS Lighting LLC and upgrade your lighting with a kit that fits the first time.
Frequently Asked Questions
Do LED headlights require special dust covers?
Yes, most LED conversion kits need an extended or modified dust cover because the bulb's cooling fan and heat sink add depth that the factory cap cannot accommodate. A standard OEM cap will press against the fan, blocking airflow and trapping heat. An extended rubber cap or a purpose-built LED dust cover gives the bulb room to breathe while still keeping dust and moisture out of the housing.
What happens if I leave my headlight dust cover off?
Leaving the cover off exposes the housing interior to dust, road spray, and moisture. Over time, condensation builds on the reflector and lens, which dulls output and can corrode electrical contacts. Insects and debris also enter freely. The bulb may run cooler without a cap, but the trade-off is a contaminated headlight assembly that degrades beam pattern and shortens the life of internal components.
Can I just drill holes in my factory dust cover for ventilation?
Drilling holes lets heat escape, but it also lets dust and water in through the same openings. Unless you add a filtered vent, the housing will collect debris and condensation. A better option is an extended rubber cap or a silicone boot designed for LED retrofits, which maintains a seal while adding the clearance the cooling fan needs. If you do drill, use a gore-vent style filter to keep contaminants out.
How do I know if I need an extended dust cover for my LED conversion?
Measure the depth from the back of the bulb base to the top of the cooling fan, then measure the interior depth of your factory cap. If the fan sits taller than the cap's internal clearance, you need an extended cover. Also check the housing diameter where the cap seats; most caps are sized in millimeters and must match the OEM opening. A test fit before final installation will confirm whether the cap clears the fan without pressure.