


Fixing LED Headlight Hyper Flash Issues: A How-To Guide

Table of Contents
- Why Your LED Headlights Are Hyper Flashing
- The LED Turn Signal Hyperflash Fix: Diagnosing the Circuit
- LED Load Resistor Installation: Simulating Incandescent Load
- Using an LED-Compatible Flasher Relay
- LED Headlights Flickering Troubleshooting: A Systematic Flow
- Modern Vehicle Electronics, Coding, and Bulb-Out Warnings
- Conclusion
- Frequently Asked Questions
Last Updated: October 19, 2026
Why Your LED Headlights Are Hyper Flashing
Hyper flash is the rapid, frantic blinking a turn signal makes after you swap incandescent bulbs for LEDs. At RMS Lighting LLC, we hear this complaint constantly, and the cause is almost always the same: the flasher thinks a bulb is dead. LEDs draw far less current than the bulbs they replaced, so the flasher's burned-out-bulb logic trips and speeds up the blink to warn you. The fix is straightforward once you know which circuit you are dealing with.
Headlight Flicker vs. Turn Signal Hyperflash
These are two different problems, and mixing them up wastes money. Turn signal hyperflash is a fast, steady blink from your indicators or hazards. Headlight flicker is a headlamp that pulses, strobes, or shuts off intermittently. A load resistor fixes the first and often does nothing for the second. Check which lamp is actually misbehaving before you buy anything.
The LED Turn Signal Hyperflash Fix: Diagnosing the Circuit
Start with a simple test: reinstall one original incandescent bulb and watch the blink rate. If the flashing returns to normal, you have confirmed a load problem, not a wiring fault. This one step saves hours of guessing.
Check the Bulb, Socket, and Ground First
Before blaming the flasher, rule out the basics. A loose socket, corroded ground, or a faulty LED bulb mimics hyperflash and fools you into buying parts you do not need.
- Confirm the LED bulb is seated fully and the polarity is correct
- Check the socket for corrosion or bent contacts
- Inspect the ground wire at the lamp housing
- Swap the suspect bulb to the other side to isolate it
- Test with the hazard switch, which runs through the same flasher
If hazards flash fast too, the fault is upstream in the flasher circuit. If only one side misbehaves, look at that bulb, socket, or wiring.
LED Load Resistor Installation: Simulating Incandescent Load
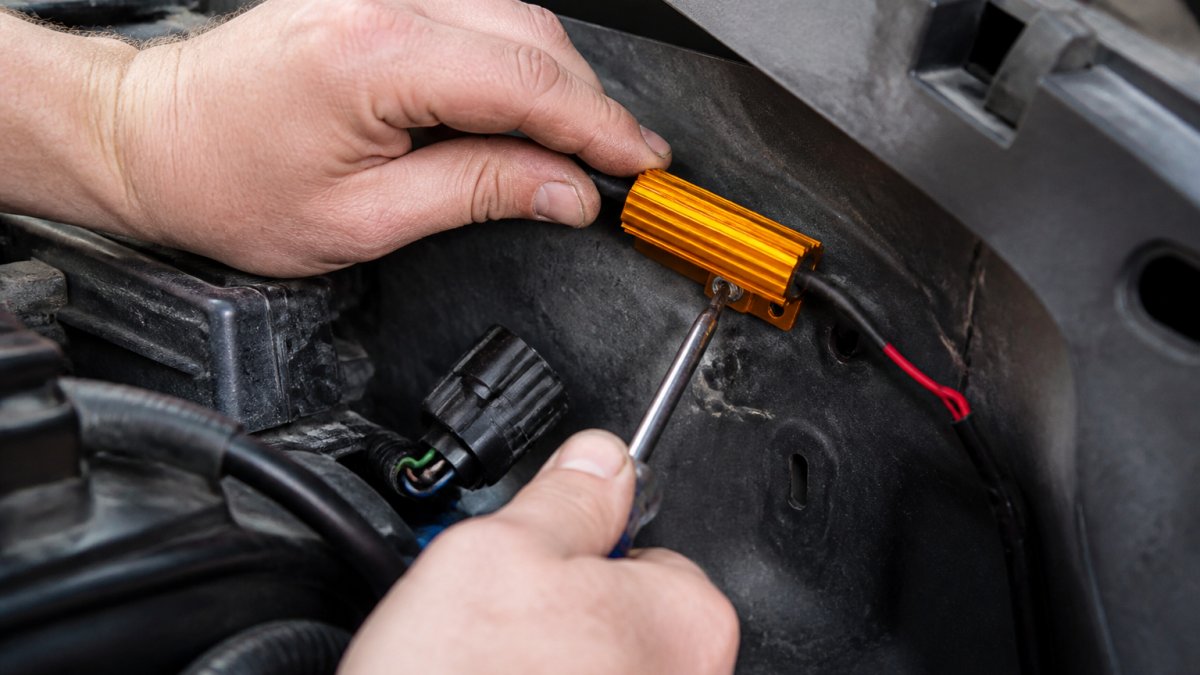
A load resistor is a simple fix: it adds electrical load back to the circuit so the flasher sees a normal bulb. You wire a 6-ohm, 50-watt resistor in parallel with the LED turn signal, across the positive and ground wires. The resistor draws current and produces heat, so mounting matters as much as wiring.
Choosing the Correct Resistor Rating and Managing Heat
Match the resistor to the bulb it replaces. A 6-ohm, 50-watt unit is the common choice for a single turn-signal position, and one resistor is needed per LED bulb. Wire it in parallel, never in series, or the lamp will not light. If you are replacing a dual-filament bulb (park/turn combined), confirm which filament circuit is monitored, some vehicles need the resistor on the turn-signal leg only, and adding it to the park leg can trigger a different fault.
Resistor wattage is a continuous rating, not a peak. A 50-watt resistor handling a turn signal that is on roughly half the time still gets hot enough to burn skin and soften wire insulation. That heat is the part most guides skip.
Heat and mounting rules that prevent fires:
- Mount to bare metal, inner fender, frame rail, or a metal bracket, never to plastic, carpet, sound deadening, or a sealed enclosure.
- Keep at least 2 inches of clearance from wiring harnesses, fuel and brake lines, and plastic trim. Heat rises, so avoid mounting directly below anything that can melt.
- Do not tuck a resistor inside a sealed headlamp or taillamp housing. Trapped heat shortens the resistor's life and can distort the lens.
- Use the supplied metal bracket and a screw or bolt; zip ties alone can let a hot resistor shift against a wire.
- Route the resistor's own leads away from sharp edges and moving parts, and secure them so vibration cannot fatigue the splice.
- After the first 10-15 minutes of hazard operation, carefully check the mounting surface temperature. If surrounding plastic is softening, relocate the resistor.
Wiring the Resistor Correctly
Identify the turn-signal positive and ground at the lamp socket. Splice one resistor lead to the signal positive and the other to ground, parallel with the bulb, not in line with it. Test with the hazard switch before buttoning up the panel: if the flash rate normalizes on both hazards and the turn signal, the load is correct. If it does not, recheck the splice and confirm you tapped the monitored circuit rather than a shared ground.
Using an LED-Compatible Flasher Relay
Swapping the flasher relay is the cleaner fix when your vehicle uses a serviceable relay. An LED-compatible flasher is built to read low-current bulbs as normal, so it restores a steady flash rate without resistors. It is plug-and-play on compatible vehicles, and it keeps heat out of your wiring.

The catch is fitment. Relays vary by pin count and socket style, so confirm yours before ordering. Our EP27 LED Flasher Relay suits EP27-style applications, while our 2-pin adjustable relay lets you dial in the flash rate by hand. Verify the relay your vehicle actually uses first.
EP27 LED Flasher Relay – Hyper Flash Fix →

| Fix | Best For | Effort | Watch Out For |
|---|---|---|---|
| Load resistor | Sealed, non-serviceable flashers | Moderate wiring | Heat, mounting location |
| LED flasher relay | Vehicles with a serviceable relay | Plug-and-play | Correct pin style and fitment |
| Resistor-free LED bulbs | Simple bulb swaps | Lowest | Not available for every socket |
LED Headlights Flickering Troubleshooting: A Systematic Flow
Work through headlight flicker in order, and stop as soon as the symptom changes. This flow keeps you from replacing good parts.
- Confirm the flicker happens with the engine running and off
- Check battery voltage and the headlamp ground
- Reseat the bulb and inspect the connector for corrosion
- Test a stock bulb in the same housing
- Check for a bulb-out warning or error code
- If the vehicle uses PWM or CAN-bus monitoring, address coding or a decoder
If a stock bulb flickers too, the fault is in the vehicle, not the LED. That distinction decides whether you need a resistor, a decoder, or a repair.
Modern Vehicle Electronics, Coding, and Bulb-Out Warnings
Newer vehicles monitor bulb current and report a failure when LEDs draw too little. The module doing the monitoring is usually the body control module (BCM), and on many models it communicates over a CAN bus. That matters because the fix is not always a resistor, sometimes it is telling the module what bulb is installed.
How the Vehicle Detects a 'Bad' Bulb
The BCM compares current draw at each lamp position against an expected range. An incandescent turn-signal bulb draws noticeably more current than an LED replacement, so the module flags the position as open or failed. Depending on the vehicle, that shows up as a bulb-out warning on the dash, a fast flash rate, a lamp that pulses, or a message in the driver-information display. Some vehicles also pulse the lamp briefly at startup to check the filament, a behavior LEDs can misinterpret as flicker.
Coding vs. Decoder vs. Resistor
There are three ways to satisfy a monitoring BCM, and the right one depends on the vehicle:
- Coding, On vehicles that support it, a scan tool can be used to change the lamp setting from incandescent to LED (or to disable cold/warm monitoring for that position). This is the cleanest fix because it adds no heat and no wiring, but it requires a capable scan tool and vehicle-specific procedure. Not every model exposes this setting.
- Decoder / anti-flicker module, An inline adapter that presents a load the BCM accepts, often without the heat of a bare resistor. Good for vehicles where coding is unavailable and a serviceable flasher relay does not exist.
- Load resistor, The universal fallback when neither coding nor a decoder is practical. It works, but it is the least elegant option on a modern monitored circuit.
Bulb-Out Warnings and Error Codes
A bulb-out warning after an LED swap is the vehicle telling you the monitored current is out of range, it is not necessarily a wiring fault. Clear the code after the fix and confirm it does not return through a full drive cycle, including a key-off/key-on cycle, since some modules only re-test at startup. If a warning persists after a correct resistor or decoder install, recheck that you tapped the monitored circuit and that the ground is clean.
The SAE lighting standards define how these lamp circuits are built, which is why fitment and load behavior vary so much by model. Always diagnose the specific vehicle before choosing a fix, and confirm your lamps meet FMVSS lighting requirements for road use.
Conclusion
Hyper flash is a load problem, and the cure depends on what your vehicle actually runs. If you are upgrading turn signals and want a clean, resistor-free fix, our plug-and-play flasher relays restore a normal flash rate on compatible vehicles. Browse the RMS Lighting LLC relay lineup and match the part to your socket before you order.
Frequently Asked Questions
Why are my LED headlights flashing?
Rapid flashing is usually a turn signal symptom, not a headlight one. LED bulbs draw far less current than incandescent bulbs, so the factory flasher relay reads them as burned out and triggers hyper flash. If your actual headlights flicker, that is a different issue caused by PWM dimming or voltage sensing, and it needs a decoder or anti-flicker module rather than a turn-signal resistor. Diagnose which light is misbehaving before buying parts.
Will an LED load resistor stop turn signal hyperflash?
Yes, when installed correctly on the turn signal circuit. A 6-ohm, 50-watt resistor draws roughly the same current as the original incandescent bulb, so the flasher sees a normal load and returns to its standard rate. Mount it to metal, away from plastic and wiring, because it gets hot during use. One resistor per LED bulb is the usual rule, and you need to tap the correct turn-signal and ground wires at each socket.
How do I know whether my vehicle needs a resistor or an LED-compatible flasher relay?
Check your flasher first. If your vehicle uses a serviceable 2-pin or EP27-style relay, swapping in an LED-compatible flasher relay is the cleanest fix and avoids cutting into factory wiring. If the flasher is built into the body control module or fuse box, a relay swap is not an option, so load resistors at each bulb are the practical route. Vehicles with bulb-out monitoring may also need a decoder or coding to clear warning messages.
Can LED turn signal bulbs cause hyperflash on their own?
They cause it indirectly. The bulb itself works fine; the problem is the lower current draw confusing the flasher circuit. Cheap bulbs with poor internal resistance and loose sockets make it worse. Start by confirming the bulb is fully seated and the ground is clean, then decide between a resistor and an LED-compatible flasher relay. If hyper flash persists after both fixes, test the turn-signal circuit for a bad ground or damaged wiring.