



How to Install H11 LED Headlight Bulbs: Step-by-Step

Table of Contents
- What You'll Need Before You Start
- Step 1: Locate the Headlight Assembly and Remove the Old Bulb
- Step 2: Install Your H11 LED Headlight Bulbs Correctly
- Step 3: Connect the Wiring Harness and Test the Lights
- Troubleshooting LED Headlight Flickering and Error Codes
- DOT Compliance for LED Headlight Upgrades
- How to Check Beam Pattern and Adjust Alignment
- Conclusion
- Frequently Asked Questions
Last Updated: September 10, 2026
What You'll Need Before You Start
Learning how to install H11 LED headlight bulbs starts with preparation, not with popping the hood. A clean workspace, the right tools, and a basic understanding of your vehicle's headlight housing will save you an hour of frustration. This guide walks through every step, from removing the factory halogen bulb to verifying beam pattern and DOT compliance.

Most guides skip the details that actually trip people up: polarity, canbus errors, and dust cover clearance. We'll cover all three. Before you touch anything, gather your tools and put on safety gear.
LED Headlight Installation Tools and Safety Gear
You need surprisingly few tools for this job, but the right ones matter:
- Safety glasses and nitrile gloves, LED bulbs have delicate chips and you should never touch the emitter surface with bare fingers
- Plastic trim removal tool, for prying clips without scratching the housing
- Flathead and Phillips screwdrivers, for battery terminal and bracket screws
- 10mm socket or wrench, common for headlight assembly bolts
- Dielectric grease, protects the electrical connection from moisture
- Zip ties, for securing excess wiring
Step 1: Locate the Headlight Assembly and Remove the Old Bulb
Park on a level surface, engage the parking brake, and disconnect the negative battery terminal before you begin. Open the hood and locate the back of the headlight housing. On most vehicles, you'll find a rubber or plastic dust cover protecting the bulb socket. Twist it counter-clockwise to remove it.
Reach inside and find the bulb's locking tab or retention clip. Press the tab and rotate the halogen bulb counter-clockwise about a quarter turn. It should release smoothly. Pull straight back, never at an angle, to avoid cracking the socket.
Step 2: Install Your H11 LED Headlight Bulbs Correctly
The H11 LED headlight bulb itself is a direct-fit replacement, but getting it seated correctly is where most installations go wrong. Align the bulb's base tabs with the housing slots, insert it fully, then rotate clockwise until the locking tab clicks into place. A partially seated bulb will produce a scattered beam pattern and can loosen over time.

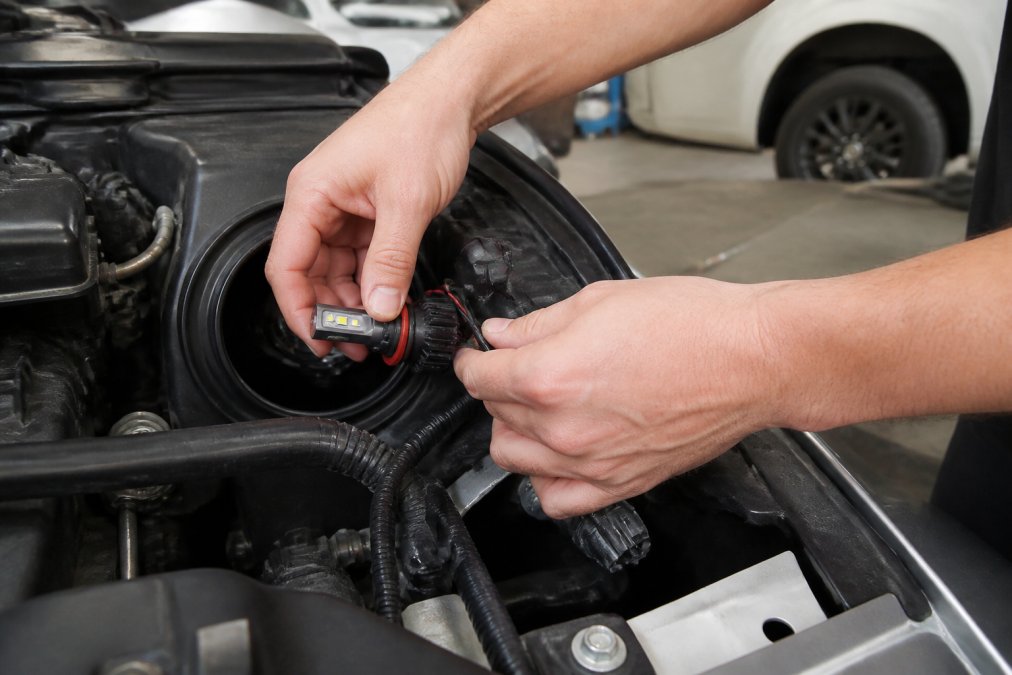
Clockwise Rotation, Locking Tab, and Polarity Checks
Polarity is the single most common cause of "my new LED bulb doesn't work." LED bulbs are polarity-sensitive: if the connector is reversed, the bulb simply won't illuminate. If your bulb doesn't light up on first test, unplug the connector, flip it 180 degrees, and reconnect. Many aftermarket harnesses are keyed incorrectly for specific vehicles.
Dust Cover Fitment and Clearance
LED bulbs with heat sinks or active cooling fans are physically longer than halogen bulbs, and the factory dust cover often won't fit back on. Options include a deeper aftermarket dust cover, a vented rubber boot, or trimming the original cover. Never leave the housing open, moisture and road debris will ruin the bulb and fog the lens.
Step 3: Connect the Wiring Harness and Test the Lights
With the bulb seated, reconnect the factory connector to the LED bulb's plug. Most H11 LED kits use a short pigtail harness with a male H11 connector on one end and a proprietary plug for the bulb's driver on the other. Push the connector in until you feel it click; a partially engaged connector is a common source of intermittent flicker that only shows up over bumps.
Reconnect the negative battery terminal, then start the engine and turn on the low beams. Test in this order:
- Low beam, both sides, confirm both bulbs illuminate at the same brightness and color temperature.
- High beam, if your vehicle uses a separate high beam, confirm it still works; if it's a dual-filament housing, confirm the shutter or second emitter engages.
- Daytime running lights (DRL), many vehicles run the low beam at reduced voltage for DRL. This is where flicker and error codes most often appear, because the reduced voltage confuses the LED driver.
- Turn signals and parking lights, confirm no hyperflash or bulb-out warnings appeared on the dash.
If one side doesn't light, unplug the connector and flip it 180 degrees before assuming the bulb is faulty. H11 connectors are not always keyed the same way across aftermarket harnesses, and a reversed connection is the single most common cause of a 'dead' LED bulb out of the box.
Wiring Management and Heat Clearance
LED drivers and inline resistors get hot. Route the pigtail and any anti-flicker module away from the exhaust manifold, turbocharger, and any coolant hose. Secure excess wiring with zip ties to the factory harness, not to the bulb's heat sink. A driver resting against the heat sink can shorten its own life and, in tight housings, prevent the dust cover from seating.
Troubleshooting LED Headlight Flickering and Error Codes
Flickering and dashboard error codes are the two most common complaints after an LED conversion, and both have straightforward fixes. Flickering usually means the vehicle's canbus system is pulsing the circuit to check for a burned-out bulb. An anti-flicker module or inline resistor installed between the harness and the bulb resolves this on most vehicles. Error codes are the same problem reported differently: the car's computer sees a lower current draw than expected and flags the bulb as failed.
| Symptom | Likely Cause | Fix |
|---|---|---|
| Flickering at idle | Canbus pulse check | Install anti-flicker module |
| Dashboard error code | Low current draw | Add inline resistor or canbus-ready bulb |
| One side dead | Reversed polarity | Flip connector 180 degrees |
| Dim output | Poor ground or connection | Clean socket, apply dielectric grease |
For vehicles with sensitive canbus systems, starting with a canbus-ready bulb like the RMSH11S130 130W Canbus LED Bulbs eliminates the guesswork entirely. RMS Lighting LLC builds canbus compatibility into its higher-output H11 options, so you skip the add-on modules.
DOT Compliance for LED Headlight Upgrades
DOT compliance for LED headlight upgrades comes down to one thing: the beam pattern. Federal standards require that headlights meet photometric requirements for glare and cutoff, and a bulb that scatters light outside the intended pattern fails those standards even if it's brighter (nhtsa.gov). The NHTSA Federal Motor Vehicle Safety Standards govern headlamp performance, and aftermarket LED bulbs are expected to preserve the factory beam pattern. RMS Lighting LLC lamps feature correct LHD lens patterns specifically to meet this requirement.
How to Check Beam Pattern and Adjust Alignment
Beam pattern is the part of an LED conversion that most guides skip entirely, and it's the part that determines whether you're legal and whether you blind oncoming traffic. A brighter bulb in a misaligned housing throws glare above the cutoff, which is exactly what federal photometric standards are designed to prevent.
The Wall Test
Park on level ground facing a flat wall or garage door about 25 feet away. The vehicle should be unloaded, with tires at normal pressure and the fuel tank roughly half full. Turn on the low beams and study the pattern:
- Cutoff line, the sharp top edge of the beam should sit slightly below the horizontal centerline of the headlight. On most vehicles the driver's side cutoff is lower than the passenger side to protect oncoming traffic.
- Hot spot, the brightest part of the beam should be centered and slightly right of the vertical centerline on the passenger side.
- Stray light, any light above the cutoff, a fuzzy edge, or a double image means the bulb isn't seated or the emitter isn't clocked correctly.
If the pattern looks wrong, reseat the bulb before touching the aiming screws. A half-seated bulb mimics a misaligned housing, and adjusting the housing to compensate will leave you with a beam that's wrong in the other direction once the bulb is seated properly.
Adjusting the Aiming Screws
Most housings have two adjustment points: one for vertical aim and one for horizontal aim. They're usually a 10mm hex or a Phillips head, located on the top and side of the housing behind the radiator support. Turn them in small increments, a quarter turn at a time, and recheck the pattern after each adjustment. Vertical aim moves the cutoff up and down; horizontal aim swings the hot spot left and right.
Aim both sides so the cutoffs match and sit at the same height. If one side is noticeably higher, you'll get a lopsided pattern that fails the wall test and annoys other drivers even if the bulb itself is fine.
Why This Matters Beyond Looks
Federal Motor Vehicle Safety Standard 108 governs headlamp performance, and it sets photometric requirements for glare and cutoff. An aftermarket LED bulb that scatters light above the cutoff doesn't meet those requirements, regardless of how bright it is. Proper alignment is what keeps a legal bulb legal in practice. It also protects the driver: a beam aimed too high lights up signs and treetops instead of the road, while a beam aimed too low cuts your usable sight distance.
Conclusion
Most H11 LED headlight installations fail for three reasons: reversed polarity, a bulb that isn't fully seated, or a dust cover that won't clear the heat sink. Solve those three and the rest is straightforward. If you want plug-and-play reliability without the canbus guesswork, RMS Lighting LLC offers H11 LED headlight bulbs with built-in drivers, active cooling, and canbus-ready designs. Browse the full range at RMS Lighting H11 LED Bulb Collection and get the visibility upgrade your vehicle deserves.
Frequently Asked Questions
Can I replace my H11 halogen bulb with an LED bulb?
Yes, H11 LED headlight bulbs are designed as direct replacements for H11 halogens. They use the same socket and connector, so no rewiring is needed. Just match the bulb type to your housing, check clearance for the heat sink or cooling fan, and verify polarity when plugging in.
Do I need a resistor or decoder when installing H11 LEDs?
Some vehicles need a canbus resistor or anti-flicker module to prevent error codes or flickering. If your H11 LED headlight bulbs flicker or trigger a dashboard warning, a plug-and-play decoder usually fixes it. Bulbs with built-in canbus drivers, like the RMSH11S130, avoid this extra step.
How do I know if my H11 LED bulb is installed correctly?
After installation, turn on the low beam and check the beam pattern against a wall. The light should be focused and level, not scattered. Also confirm the bulb is locked in the socket with no movement, and that the connector is fully seated.
What is the correct orientation for H11 LED headlight bulbs?
LED bulbs have a specific orientation: the LED chips should face left and right, parallel to the ground, not up and down. If the bulb has a locking tab, align it with the housing notch. Incorrect orientation causes scattered light and poor beam pattern.