



LED Headlight Beam Pattern Issues Explained

Table of Contents
- Why LED Headlight Beam Pattern Issues Happen
- Projector vs. Reflector Housing Compatibility
- The Role of Focal Point Alignment in Beam Pattern
- How to Align LED Headlights Correctly
- LED Headlight Bulb Orientation and Installation
- DOT Headlight Compliance Standards and Beam Cutoff
- Diagnosing Common Beam Pattern Problems
- Frequently Asked Questions
Last Updated: September 2, 2026
Why LED Headlight Beam Pattern Issues Happen
LED headlight beam pattern problems stem from a mismatch between halogen and LED light source geometry. A halogen filament is a thin wire; an LED is a small semiconductor chip. If the chip sits even a few millimeters off from where the original filament was positioned, the entire beam pattern shifts, creating glare, dark spots, or scattered light instead of a crisp, well-defined beam cutoff.
At RMS Lighting LLC, we've engineered our LED conversion kits to address this challenge by ensuring the diode placement matches the original focal point precisely.

Causes of LED Beam Pattern Misalignment
LED headlight beam pattern misalignment falls into three categories: housing incompatibility, improper bulb orientation, and incorrect focal point alignment.
Housing incompatibility is the most common culprit. Reflector housings use a parabolic mirror engineered around halogen bulb characteristics. Installing an LED bulb designed for projector housings into a reflector breaks down the beam geometry, resulting in scattered light without a proper cutoff line.
Improper bulb orientation creates additional problems. LEDs have a diode that must be clocked, rotated to the correct angle, to align with the housing's optical design. Even a 45-degree rotation error degrades beam pattern quality significantly.
Incorrect focal point alignment happens when the LED bulb sits too far forward or back in the housing. The LED chip must sit at the exact same depth as the original halogen filament, or the beam pattern will be soft, diffuse, or misaligned.
LED Chip Orientation and Clocking
LED chip orientation, called "clocking," is where many conversions fail. The LED diode must be rotated to match the housing's optical axis. If the diode is clocked 180 degrees from where it should be, you'll get the inverse of the correct beam pattern: dark spots where there should be light, and glare where there should be shadow.
Clocking is critical in projector housings, which use a lens to focus light. The lens has a specific optical axis, and the LED diode must align with it for a clean beam cutoff. Many budget LED kits don't address clocking at all, assuming a standard orientation works across all vehicles. This fails because vehicle housings vary in internal geometry, requiring different focal point depth and diode orientation.
Projector vs. Reflector Housing Compatibility
The type of housing your vehicle uses determines which LED conversion approach will work.
Projector housings use a lens mounted in front of the light source to focus and direct the beam with a sharp cutoff line. Projector housings are common on modern vehicles and some classic trucks from the 1980s onward. LED bulbs designed for projector housings can work well because the lens compensates for minor misalignments better than a reflector does. However, the LED must still be clocked correctly.
Reflector housings use a curved mirror behind the light source to focus light forward. No lens sits in front. The reflector's parabolic curve does all the work of shaping the beam. This design is less forgiving of misalignment. If the light source sits even 2-3 millimeters off the focal point, the beam pattern degrades noticeably. Reflector housings are standard on classic vehicles and many modern budget vehicles.
An LED designed for a projector housing will not produce a clean beam pattern in a reflector housing, and vice versa. The bulb's internal geometry is optimized for one type of housing.
| Housing Type | Focal Point Sensitivity | Clocking Critical | Best LED Design |
|---|---|---|---|
| Reflector | Very high (2-3mm tolerance) | Moderate | Sealed beam conversion kit |
| Projector | Moderate (5-7mm tolerance) | High | H4 or H7 bulb format |
RMS Lighting LLC's conversion kits are engineered specifically for sealed beam reflector housings, positioning the LED diode to match the focal point of your classic vehicle's original halogen setup.

The Role of Focal Point Alignment in Beam Pattern
The focal point is the distance from the reflector where light converges into a focused beam. Get this distance wrong, and your beam pattern will be soft, diffuse, or misaligned.
For reflector housings, the focal point is typically 1.5 to 2.5 inches behind the reflector's mirror surface. An LED bulb's diode must sit at the exact same depth as the original halogen filament. If the diode is positioned 3 millimeters deeper, the focal point shifts and the projected beam becomes diffuse (peer-reviewed research). If positioned shallower, light converges in front of the reflector, creating a hotspot.
Testing focal point alignment requires a wall test. Park 25 feet from a wall on level ground. Turn on the low beams. A correctly aligned beam shows a sharp, horizontal cutoff line that is level across the width, with no bright spots above the line and no dark gaps below it.
How to Align LED Headlights Correctly
Proper LED headlight alignment involves mechanical installation and beam pattern adjustment.
Step-by-Step Leveling and Adjustment Process
Step 1: Verify housing level and vehicle stance. Park on level ground and check that your vehicle isn't tilted due to suspension issues or cargo load.
Step 2: Install the LED bulb with correct orientation. Consult your kit's documentation for the correct diode clocking angle. Most sealed beam LED conversions have a mark on the base that must align with a corresponding mark in the housing.
Step 3: Perform a wall test. Park 25 feet from a flat wall at night. Turn on the low beams. The cutoff line should be sharp and level, with bright, evenly distributed light and no dark spots or scattered light.
Step 4: Adjust the headlight leveling screws if needed. Most vehicles have vertical and horizontal adjustment screws on the back of the headlight housing. Make small adjustments, typically a quarter turn at a time, and retest after each.
Step 5: Check for glare and dark spots. If you see a bright spot above the cutoff line, the beam is aimed too high. If you see dark spots in the center, the focal point may be misaligned or the LED bulb may not be clocked correctly.
Step 6: Test on the road. Drive at night on roads with oncoming traffic. If other drivers flash their lights, your beam is likely too high. Adjust downward slightly and retest.
LED Headlight Bulb Orientation and Installation
Getting bulb orientation right is the difference between a clean beam pattern and a problematic one.
Filament Position and Diode Placement
The original halogen H4 bulb has a filament that sits in a specific position relative to the base, engineered to align with the focal point of your vehicle's headlight housing. When you replace it with an LED, the diode must occupy that same position in three-dimensional space.
Most LED H4 bulbs have an alignment mark, a flat edge, notch, or raised line, on the base. This mark must align with a corresponding mark or slot inside the housing. Rotating the bulb to align these marks ensures the diode sits at the correct depth and angle.
The diode also emits light in a specific pattern relative to its orientation. If rotated 90 degrees from the correct position, the beam pattern will be rotated 90 degrees as well, creating an asymmetrical beam with bright spots on one side and dark spots on the other.
Using a kit specifically designed for your housing type matters. RMS Lighting LLC's conversion kits come with LED bulbs engineered to match the focal point and optical characteristics of sealed beam reflector housings used in classic vehicles.
DOT Headlight Compliance Standards and Beam Cutoff
In the United States, headlight performance is governed by the Department of Transportation (DOT) and the Society of Automotive Engineers (SAE). The SAE J581 standard defines specifications for low-beam headlight performance, including the position and sharpness of the cutoff line. The FMVSS 108 regulation enforces these standards for vehicles sold in the United States, specifying minimum light output (typically 500-1000 lumens per low beam), maximum glare limits, and beam pattern geometry.
Many LED conversions fail here. Budget kits prioritize brightness over beam pattern, using high-output LEDs (10,000+ lumens) without engineering proper optical design, resulting in brighter light that creates glare and dark spots, violating SAE and DOT standards.
Proper LED conversion kits, like those from RMS Lighting LLC, are designed to meet these standards. The LED diode is positioned to maintain the correct focal point, and the housing's internal geometry is optimized for the LED's light output characteristics, delivering a brighter beam that maintains a clean cutoff line and complies with DOT standards.
Diagnosing Common Beam Pattern Problems
When your LED headlights don't perform as expected, the issue usually falls into one of several categories.
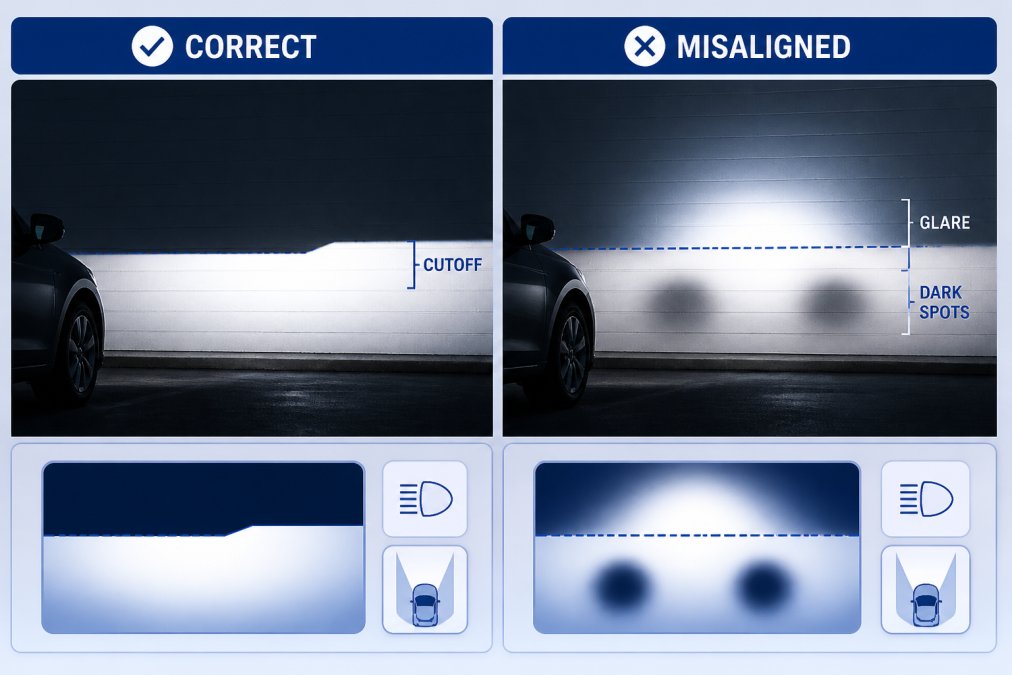
Glare, Dark Spots, and Scattered Light
Glare appears as a bright spot above the cutoff line when the LED bulb is aimed too high or the diode is positioned too far forward. Fix: Lower the headlight's vertical aim by adjusting the leveling screws in quarter-turn increments. If lowering the aim doesn't resolve glare, verify the bulb's orientation mark is aligned correctly. If it is, the LED bulb may be incompatible with your housing type.
Dark spots in the center or edges indicate focal point misalignment, often caused by an LED bulb designed for a different housing type. Fix: Verify the bulb orientation is correct. If dark spots persist, consider a conversion kit engineered specifically for your housing type, such as RMS Lighting LLC's sealed beam kits for classic vehicles.
Scattered light appears as a diffuse glow without a sharp cutoff, indicating the diode is positioned too far back or the LED bulb's internal design doesn't match your housing's optical requirements. Fix: Check that the bulb is fully seated and the orientation mark is aligned. If scattered light persists, the LED bulb is not optimized for your housing.
Flickering, Dimming, and Voltage Issues
Flickering is usually caused by voltage regulation issues in the LED bulb or poor electrical connection. Fix: Check battery voltage with a multimeter, it should be 13.5-14.5 volts when the engine is running. If voltage is normal, the LED bulb's internal driver may be faulty.
Dimming occurs when light output decreases over time, caused by overheating due to poor heat dissipation. Fix: Ensure the LED bulb has adequate ventilation. If dimming persists, a higher-quality conversion kit with better heat sinking will resolve this.
Voltage issues can trigger the check engine light if your vehicle monitors headlight current draw. LEDs draw less current than halogen bulbs, potentially triggering a fault code. Fix: Some LED kits include load resistors or can-bus decoders to simulate halogen current draw.
Proper LED headlight installation is about precision, not just power. Beam pattern issues stem from misalignment between the LED diode and the housing's optical design. By understanding the causes, housing incompatibility, improper clocking, and focal point misalignment, you can diagnose problems and choose the right solution.
When you're ready to upgrade, choose a kit engineered for your specific housing type. RMS Lighting LLC's sealed beam conversion kits are designed to match the focal point and optical characteristics of classic vehicle headlights, delivering a clean beam pattern that improves visibility while maintaining DOT compliance. Our 7-inch round conversion kit and 5x7 rectangular conversion kit deliver 10,000 lumens of focused light with proper beam cutoff, ensuring you see the road clearly without blinding oncoming traffic. Get started with RMS Lighting LLC and experience the difference that precision-engineered LED conversion makes for your driving safety and vehicle appearance.
Frequently Asked Questions
What are the most common LED headlight beam pattern issues?
The most common problems include misaligned beam patterns that create glare for oncoming drivers, dark spots in the beam throw where light doesn't reach the road, scattered light that reduces overall visibility, and improper cut-off lines that don't match DOT standards. These issues typically stem from incorrect LED chip orientation, incompatible housing types, or improper focal point alignment. Identifying which problem you have is the first step to fixing it.
How do I know if my LED headlights are properly aligned?
Proper alignment means the beam pattern has a sharp cut-off line that doesn't blind oncoming traffic, even light distribution across the beam spread, and a hotspot that illuminates the road ahead without dark spots. You can test this by projecting the beam onto a wall 25 feet away at night. The low beam should show a defined cutoff with the brightest area below the horizontal line. If you see scattered light, excessive glare above the cutoff, or uneven intensity, realignment is needed.
Should LED headlight bulbs be installed horizontally or vertically?
LED bulb orientation depends on your specific housing design. Most sealed beam conversions require the LED diode to be positioned to match the original halogen filament position. Incorrect bulb orientation causes beam pattern artifacts and poor light distribution. Check your kit's installation guide for the correct orientation. RMS Lighting conversion kits are engineered with the proper diode placement already accounted for in the housing design, ensuring correct beam geometry when installed as directed.
What does DOT compliance mean for headlight beam patterns?
The DOT and SAE set standards for headlight beam cutoff, intensity, and distribution to protect road safety. DOT-compliant headlights must have a defined cutoff line that prevents glare to oncoming drivers while maintaining adequate beam intensity and coverage. Non-compliant LED conversions can blind other drivers or fail to provide adequate illumination. When selecting an LED conversion kit, verify it's engineered to meet DOT/SAE standards for your vehicle's headlight type to ensure legal operation and safe beam patterns.
This article was written using GrandRanker