



What Is a CANbus LED Headlight Kit? Full 2026 Guide

Table of Contents
- What Is a CANbus LED Headlight Kit and Why Your Car Needs One
- LED Headlight Flicker Causes and Dashboard Warning Lights
- How to Install LED Headlight Decoders Without Wiring Headaches
- Best LED Conversion Kits for Trucks and Older Vehicles
- 12V vs 24V Systems: Matching Voltage and Load Simulation
- Thermal Management, Legal Compliance, and What to Ignore
- Conclusion
- Frequently Asked Questions
Last Updated: September 14, 2026
What Is a CANbus LED Headlight Kit and Why Your Car Needs One
A CANbus LED headlight kit is an LED bulb setup paired with a decoder module that mimics the electrical load of a factory halogen bulb, preventing dashboard errors and flickering. At RMS Lighting LLC, we specialize in providing best-in-class LED headlamp conversion kits and bulbs that replace factory components with ease, ensuring you benefit from the latest in lighting technology.
The problem comes down to how your car checks its own lights. Older vehicles simply ran power to a bulb and let it glow. Modern vehicles route lighting through the Controller Area Network, a communication protocol that lets the electronic control unit monitor every circuit. When you drop in an LED bulb that draws a fraction of the current a halogen bulb needs, the ECU reads that low draw as a burned-out bulb and lights up your dashboard.
That single mismatch explains most LED conversion headaches: warning lights, hyper-flash, and flickering. A proper CANbus LED headlight kit solves it at the source with load simulation rather than masking the symptom.
SAE International standards for automotive lighting
How the Controller Area Network Monitors Your Bulbs
The Controller Area Network is a vehicle communication bus that lets control modules share data over a two-wire harness. Your body control module continuously reads the current flowing to each bulb. A halogen bulb pulls substantial amperage; an LED pulls a small fraction of that. When the reading falls outside the expected range, the module flags a bulb-out indicator.
A CANbus decoder adds a resistor or capacitor circuit that restores the expected electrical load. The diagnostic system sees normal current, and the warning stays off.
Built-In vs External Decoders: Which Kit Fits Your Setup
Built-in decoders live inside the bulb housing or driver. External decoders are separate modules that wire between the factory harness and the bulb. Built-in units keep the engine bay clean, but external modules handle stubborn vehicles better because you can swap or upgrade them independently.
| Decoder Type | Best For | Trade-off |
|---|---|---|
| Built-in | Most daily drivers, tight housings | Less flexibility on fussy systems |
| External | Older trucks, sensitive ECUs | Extra module to mount and secure |
LED Headlight Flicker Causes and Dashboard Warning Lights
Flickering and warning lights almost always trace back to one of three causes: low current readings, PWM dimming, or a loose harness connection. Fix the cause, not the symptom.
The most common mistake is buying a bare LED bulb with no decoder and assuming it will behave. It rarely does. A bulb that flickers on startup or pulses at idle is telling you the module is cycling power because it can't confirm a valid load.
Pulse Width Modulation and the Low Current Reading Problem
Pulse Width Modulation is a technique where the module switches voltage on and off rapidly to control brightness. Your factory halogen bulb's thermal inertia smooths those pulses into steady light. An LED reacts instantly, so you see the flicker the halogen hid.
This is why anti-flicker capacitors and load resistors exist. They smooth the current reading and hold voltage steady, so the module stops hunting for a load it can't find.
How to Install LED Headlight Decoders Without Wiring Headaches
Most plug-and-play kits install in under an hour with basic hand tools, and you do not need to cut factory wiring if the kit uses OEM-style connectors. The headaches come from three places: not confirming your vehicle's communication protocol first, mounting the decoder where it cooks, and skipping the post-install diagnostic sweep.
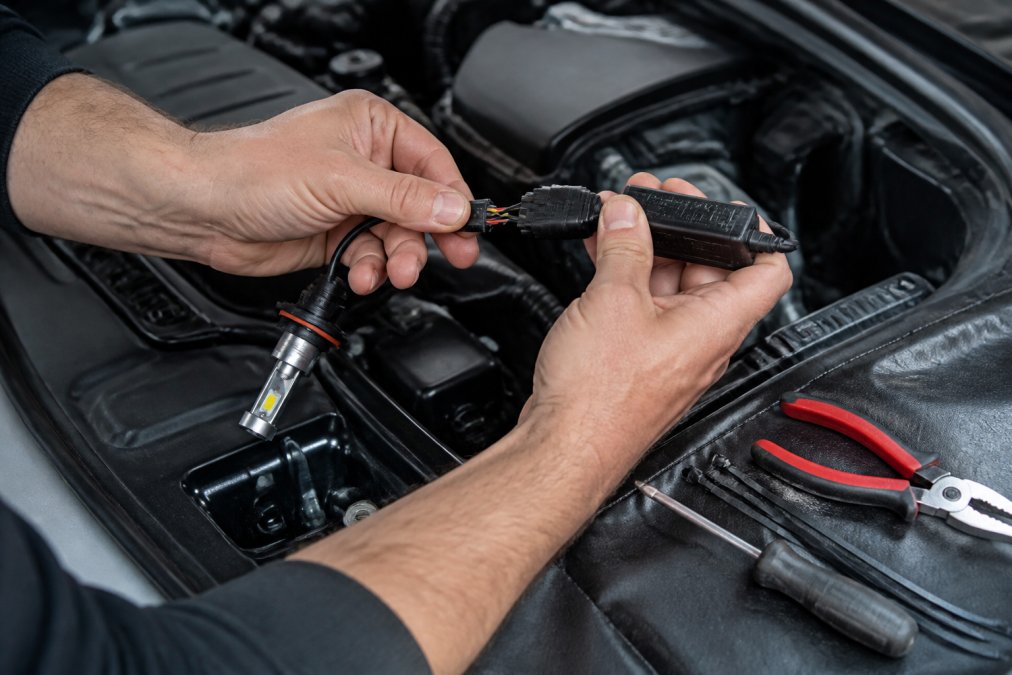
Step 1: Confirm Your Vehicle's Protocol Before You Buy
This is the step competitors skip, and it is the one that decides whether your kit works on the first try. Vehicles do not all monitor bulbs the same way. A practical framework:
- Model year and platform. Vehicles roughly from the mid-2000s onward are far more likely to run bulb-out monitoring through a body control module or lighting control module. Older platforms often use simpler relay or resistance-based checks that a basic load resistor satisfies.
- Bulb-out detection method. Some modules measure current draw directly; others pulse the circuit briefly when the vehicle wakes and look for a return signal. A decoder that only adds resistance can satisfy the first but not always the second.
- Bulb type and position. A headlight low beam, a turn signal, and a tail lamp can be monitored by different modules with different thresholds. A kit that works on your low beams may still trigger a warning on your turn signals.
- Voltage system. Confirm 12V versus 24V before ordering (covered in the next section).
If you cannot find your vehicle's protocol in the kit documentation, the safest path is a kit with an external, swappable decoder rather than a sealed built-in unit. That way you can change the load simulation without replacing the bulb.
Step 2: Mount the Decoder Where It Can Breathe
Decoder modules and LED drivers convert excess energy into heat. Trapped heat is the number one killer of decoder modules, and a melted module can short your lighting circuit. Mounting rules that hold up in practice:
- Keep the module at least a few inches away from the valve cover, exhaust manifold, turbo, and any exhaust-adjacent sheet metal.
- Do not zip-tie the module directly against another hot surface or wrap it in foam or tape that traps heat.
- Prefer a location with airflow inside the engine bay, or behind the headlight housing where ambient temperatures stay lower.
- If the housing is fully sealed, choose a kit with active cooling (a driver fan) rather than a passive unit.
Step 3: The Install Sequence
- Disconnect the negative battery terminal before touching any harness.
- Remove the factory bulb and set it aside.
- Connect the decoder between the factory plug and the new LED bulb. On external-decoder kits, the decoder sits inline; on built-in kits, the driver is already part of the bulb assembly.
- Secure the decoder module away from heat sources and moving parts using the supplied bracket or a heat-resistant mount.
- Reconnect the battery and test low beam, high beam, and turn signals one at a time.
- Watch the dashboard for any bulb-out indicator during the first start, and again after a short drive cycle.
Step 4: Post-Install Diagnostic Sweep
If a warning appears, work through this order before assuming the kit is faulty:
- Reseat every connector. Loose connections cause more false errors than bad decoders.
- Swap the decoder to the opposite side to see if the fault follows the module or stays with the circuit.
- Check for hyper-flash on turn signals specifically, which points to a load-simulation mismatch rather than a wiring fault.
- Confirm the module is not sitting against a heat source that is causing it to derate or shut down.
Best LED Conversion Kits for Trucks and Older Vehicles
Older trucks and classic vehicles are the toughest conversion candidates because their electrical systems were never designed for LED loads. The right kit depends on your voltage, housing depth, and how sensitive your module is.
For most trucks and pre-2010 vehicles, an external decoder kit with a built-in driver fan runs cooler and lasts longer. RMS Lighting LLC offers original-style conversion kits built for exactly this scenario, with correct left-hand-drive lens patterns.
NHTSA guidance on vehicle lighting equipment
12V vs 24V Systems: Matching Voltage and Load Simulation
Voltage mismatch is the fastest way to destroy a decoder. Most passenger vehicles run a 12V nominal system; heavy trucks and some commercial platforms run 24V. A decoder rated for one will fail on the other, often within minutes, because the internal resistor and capacitor network is sized for a specific voltage window.
| System | Typical Vehicles | Decoder Requirement |
|---|---|---|
| 12V | Cars, light trucks, classics | 12V-rated or 9-16V range |
| 24V | Heavy trucks, commercial | 24V-rated or 9-32V range |
Why the Voltage Window Matters More Than the Nominal Rating
A 12V system does not actually sit at 12V. With the engine running, the alternator typically holds the system around 13.5 to 14.5 volts, and transient spikes can push higher. A decoder rated only for a narrow 12V window can overheat or fail when the alternator is charging hard. That is why kits rated for a 9-32V range, like several RMS Lighting LLC options, cover both 12V and 24V platforms.
On 24V commercial platforms, the same logic applies in reverse: a 12V-only decoder sees roughly double its rated voltage and will fail. Always match the decoder's rated window to the vehicle's actual operating voltage, not just the label on the battery.
How Load Simulation Interacts With Voltage
The decoder's job is to make the module see the current draw it expects from a halogen bulb. Current draw depends on both voltage and resistance. If you install a decoder sized for 12V on a 24V system, the current through the resistor roughly doubles, which is why the module may briefly see a "correct" load before the resistor overheats and fails. Matching the voltage window keeps the simulated load in the range the module was calibrated for.
PWM Behavior Across Voltage Systems
Pulse Width Modulation is the technique modules use to switch voltage on and off rapidly to control brightness or to pulse a circuit for diagnostics. On 12V systems, PWM frequencies are typically high enough that a halogen bulb's thermal inertia smooths the pulses into steady light. An LED reacts instantly, so you see the flicker the halogen hid. On 24V commercial systems, PWM behavior and diagnostic pulse patterns can differ, which is another reason a decoder tuned for a passenger-car 12V circuit may not behave correctly on a heavy truck.
Quick Check Before Ordering
- Confirm your vehicle's system voltage from the owner's manual or a multimeter reading at the battery with the engine running.
- Confirm the decoder's rated window covers that reading with headroom for charging spikes.
- If you drive a 24V commercial platform, do not assume a passenger-car kit will work even if the connector fits.
- If you are unsure, choose a kit with an external, swappable decoder so you can correct the load simulation without replacing the bulb.
Thermal Management, Legal Compliance, and What to Ignore
LED drivers and decoders generate heat, and trapped heat shortens lifespan. Kits with active cooling fans move that heat away, which matters in sealed housings. Passive kits work in open housings but run hotter in summer traffic.
On compliance, federal rules require that replacement lighting meet applicable standards for beam pattern and output. A kit with a correct lens pattern and tested output keeps you legal and keeps oncoming drivers safe. Ignore marketing claims about "off-road only" bulbs if you drive on public roads.
Federal Motor Vehicle Safety Standards for lighting
Conclusion
Getting a CANbus LED headlight kit right comes down to matching load simulation, voltage, and thermal design to your specific vehicle. RMS Lighting LLC builds researched, tested conversion kits with correct lens patterns, original-style plug-and-play fitment, and options to upgrade to 90-Watt or 130-Watt bulbs for drivers who want improved visibility with the latest LED technology. Explore the RMS Lighting LLC catalog and find the kit engineered for your vehicle.
Frequently Asked Questions
Do you need a CANbus for LED headlights?
Not every vehicle requires one. Cars and trucks built after roughly 2005 often run a Controller Area Network that monitors bulb current and triggers a dashboard warning when resistance drops. If your factory halogens used 55W and your new LED draws 20W, the system reads that gap as a failed bulb. A CANbus LED headlight kit adds load simulation so the computer sees normal current. Older vehicles with simple relay wiring usually run LEDs without a decoder.
Will LED headlights cause dashboard error codes without a CANbus?
They can. When the electronic control unit checks a circuit and reads lower current than expected, it flags a bulb out indicator or shuts the circuit down entirely. That is why cheap LED kits often produce hyper-flash, flickering, or a warning light within seconds of installation. A decoder or resistor built into the kit restores the electrical load the computer expects, so the diagnostic system stays quiet.
How do I know if my vehicle requires a CANbus LED kit?
Check your owner's manual or look for a bulb out indicator that lights briefly at startup, which signals a monitored circuit. Vehicles with a digital dashboard display, automatic headlight warnings, or pulse-checking daytime running lights almost always need decoders. If you install standard LEDs and see flickering or a warning light, that confirms the vehicle monitors current and needs a CANbus-compatible kit.
Can I use a CANbus decoder with standard LED bulbs?
Yes, as long as the decoder matches your bulb type and voltage. External decoders wire in line between the factory harness and the bulb, adding resistance and smoothing the pulse width modulation signal. Built-in decoders sit inside the bulb base and skip that extra step. Match the decoder to your 12V or 24V system and confirm the connector type before ordering, since a mismatched harness will not seat properly.