



Modernize Classic Car Lighting Without Cutting Wires

Table of Contents
- Why Modernize Classic Car Lighting Without Cutting Wires
- Understanding Your Car's Electrical System Before You Start
- Plug and Play LED Headlight Conversion Kits: What to Look For
- The Classic Car Headlight Relay Harness Benefits for Old Wiring
- Step-by-Step: Swap Bulbs Without Splicing or Cutting
- DOT Compliance for LED Headlight Upgrades: Staying Legal
- Fixing Hyper-Flash and Other Common Issues
- Final Checks and Reversibility Documentation
- Frequently Asked Questions
Last Updated: September 5, 2026
Dim halogen bulbs and aging wiring make nighttime driving in a classic car a gamble. You can modernize classic car lighting without cutting wires, preserving originality while gaining the safety of modern LED technology. At RMS Lighting LLC, we have tested countless conversion kits and provide products that have been rigorously researched and tested. This guide walks you through a fully reversible, plug-and-play approach that delivers brighter light without a single splice.
The core principle is reversibility: every component should unplug as easily as it plugs in, leaving the factory harness untouched. This protects your car's value and avoids electrical fires from amateur splicing. The best way is using quality plug and play LED headlight conversion kits paired with a dedicated relay harness.
Why Modernize Classic Car Lighting Without Cutting Wires
The primary reason to avoid cutting wires is preservation. A classic car with an unmodified factory harness is worth more, easier to troubleshoot, and remains eligible for restoration. Cutting into original wiring introduces resistance points, corrosion risks, and fire hazards.
Beyond preservation, the performance argument is compelling. Factory halogen bulbs produce dim, yellow light that struggles against modern traffic. An LED conversion dramatically increases lumen output while drawing less electrical load, giving you a brighter, whiter beam that makes obstacles visible sooner, a highly effective safety upgrade for a vintage vehicle.
Understanding Your Car's Electrical System Before You Start
Before you buy anything, know what you are working with. Most classic cars use a 12-volt negative-ground system, but some 6-volt vehicles from the 1950s or early imports are exceptions. Verify your system's voltage at the battery terminals and confirm polarity before ordering parts.
A common mistake is ignoring the condition of the factory wiring. Old insulation becomes brittle, and connections corrode. If your headlights dim when you press the brake or at idle, you likely have a voltage drop caused by poor connections or undersized wiring. The National Highway Traffic Safety Administration guidelines on vehicle lighting emphasize that consistent voltage is critical for predictable light output. A relay harness addresses this by drawing power directly from the battery, bypassing the aged factory switch and wiring. This is where the classic car headlight relay harness benefits become obvious: it delivers full battery voltage to your new bulbs, eliminating the dimming and flicker associated with old circuits.
Plug and Play LED Headlight Conversion Kits: What to Look For
Not all LED kits are created equal, and cheap options often fail within months. Focus on three things: the driver design, the cooling solution, and the connector type. Look for true plug-and-play kits with the exact bulb base your car uses, such as H4 or H13, requiring no modification to the factory socket.
A high-quality driver regulates current to prevent flicker and protects the LEDs from voltage spikes. The cooling solution, usually a fan or heat sink, determines whether the bulb lasts or burns out. Consider color temperature: 6000K offers a modern look and excellent visibility, while 4300K is closer to factory halogen output. Avoid anything above 6500K, as it takes on a blue tint that reduces usable light.
| Kit Feature | Why It Matters | Red Flag to Avoid |
|---|---|---|
| Driver design | Prevents flicker and voltage spikes | No current regulation |
| Cooling solution | Extends bulb lifespan | Passive heat sink on high-wattage bulbs |
| Connector type | Must match factory base exactly | Adapters that require splicing |
| Color temperature | 4300K-6000K is optimal for visibility | Bluish light above 6500K |
The Classic Car Headlight Relay Harness Benefits for Old Wiring
A relay harness is a highly impactful upgrade for a classic car, even before changing the bulbs. Factory wiring in a 1960s car was designed for 55-watt halogen bulbs and routes all current through the dashboard switch. Over decades, switch contacts oxidize, creating resistance and voltage drop. A relay harness uses the factory switch only to trigger a relay, sending full battery power directly to the headlights.
The results are immediate: headlight brightness increases because bulbs receive 12.5 volts instead of 10.5 volts, and the dashboard switch lasts longer because it no longer carries the full current load. Most relay harnesses are completely plug-and-play, connecting to the battery, factory headlight connectors, and the switch wire.
Step-by-Step: Swap Bulbs Without Splicing or Cutting
The entire process takes about an hour and requires no special skills. The guiding principle is that every component you add must be removable with the same tools you used to install it, no drilled holes, no cut wires, no permanent adhesive residue.
Tools You'll Need
- A flathead and Phillips screwdriver
- A pair of pliers for stubborn connectors
- Dielectric grease for weatherproofing
- Zip ties to secure the new wiring harness
- 3M VHB double-sided tape (for mounting drivers and relays)
- A small metal bracket or P-clip (for securing components without drilling)
No wire strippers, no crimpers, no solder. If you find yourself reaching for those, you are doing it wrong.
Step 1: Disconnect the Battery and Remove the Old Bulb
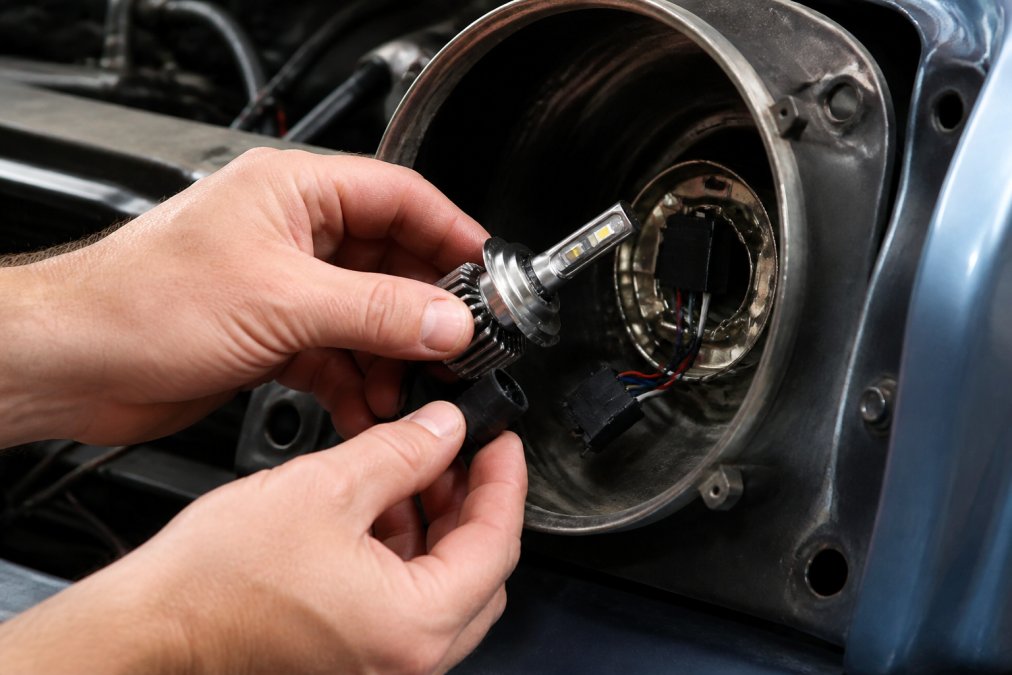
Disconnect the negative battery terminal first, this is non-negotiable for safety. Remove the headlight bezel or trim ring, usually held by three small screws. Remove the retaining ring, gently pull the old halogen bulb straight out, unplug it from the factory connector, and set it aside in a labeled bag for future return to stock.
Step 2: Install the New LED Bulb and Connect the Driver
Remove the new LED bulb without touching the LED chips or glass surface, oils from your skin cause hot spots that shorten bulb life. Align the bulb's locking tabs with the slots in the housing, insert it, and secure it with the retaining ring. Connect the bulb's pigtail to the driver, then plug the driver's connector into your factory headlight socket until it clicks firmly.
Step 3: Mount the Driver and Relay Harness Without Drilling
Most guides assume you are willing to drill into your core support or fender to mount the driver and relay. Drilling is permanent and damages collector value. Instead, use these non-destructive mounting techniques:
- 3M VHB tape: This automotive-grade acrylic foam tape is the same product automakers use to mount trim and emblems. Clean the surface with isopropyl alcohol, let it dry, then press the driver's mounting flange onto the tape. VHB tape holds up to 10 pounds per square inch, handles engine bay temperatures up to 250°F, and leaves no residue when removed with a heat gun or fishing line.
- P-clips and existing fasteners: Many classic cars have unused threaded holes or existing bolts for the horn, voltage regulator, or inner fender liner. Use a P-clip (a rubber-lined metal clamp) around the harness or driver, then secure the P-clip to an existing bolt. This requires zero drilling and is fully reversible.
- Zip tie mounts: Adhesive-backed zip tie mounts (available at any auto parts store) let you route the relay harness along existing wire looms without cutting or splicing. Apply the mount to a clean surface, thread a zip tie through it, and secure the harness.
Step 4: Connect the Relay Harness (If Applicable)
If installing a relay harness, run the leads to the battery terminals, connect the ground wire to a clean chassis point using an existing bolt, and plug the harness into the factory switch connector and both headlight bulbs. Secure with zip ties away from moving parts and exhaust heat. Reconnect the battery and test the lights before reassembling the trim.
Step 5: Document Everything for Future Reversibility
Before closing the hood, take photos of the installation from three angles: the bulb connection, the driver mounting point, and the relay harness routing. Write down which existing bolts you used and where the zip tie mounts are placed. Store this documentation with your original halogen bulbs in a labeled box, your reversibility kit for returning the car to factory stock in under an hour.
:::warning Never use zip ties to secure a relay harness to the fuel line, brake lines, or any moving suspension component. The vibration will eventually chafe through the harness insulation and cause a short. Route all wiring along factory wire looms and secure it to stationary sheet metal only.
:::takeaway The difference between a reversible upgrade and a permanent modification is not the bulb, it is how you mount the supporting components. VHB tape, P-clips, and existing fasteners give you the same secure installation as drilling, but they leave your classic car's sheet metal untouched and its value intact.
DOT Compliance for LED Headlight Upgrades: Staying Legal
The question of legality is straightforward: your headlights must produce a proper beam pattern that does not blind oncoming traffic. While LED bulbs are not explicitly prohibited, they must meet the same Federal Motor Vehicle Safety Standard 108 requirements that apply to halogen bulbs. The Federal Motor Carrier Safety Administration lighting regulations state that all headlamps must be certified to meet these standards.
The critical issue is the beam pattern. A halogen bulb emits light from a filament at a specific point in the housing; an LED emits from a flat surface, which can scatter light incorrectly if not designed with the correct focal point. You need a kit with a beam pattern that matches the original halogen output. RMS Lighting LLC tests its kits in actual housings to confirm the cutoff line is sharp and light is directed onto the road, not into oncoming drivers' eyes.
Fixing Hyper-Flash and Other Common Issues
Hyper-flash is the rapid blinking of turn signals after an LED conversion. It happens because LEDs draw far less current than incandescent bulbs, typically 0.1 amps versus 1.5 amps for a 1156 bulb, and the factory flasher relay interprets the reduced load as a burned-out bulb. The fix is simple: replace the factory flasher with an electronic LED flasher relay designed for your vehicle.
RMS Lighting LLC offers a 2-Pin Speed Adjustable LED Flasher Turn Signal Relay that directly replaces the OEM two-pin flasher. It is fully waterproof and allows you to adjust flashing speed from 50 to 200 cycles per minute with a small screwdriver. For vehicles with a ground wire, our 2 Pin Hyper Flash Flasher with Ground Wire eliminates hyper-flash and restores normal hazard warning function. This is the cleanest solution, no load resistors, no splicing, no heat-generating resistors taped to your wiring.


Why Load Resistors Are a Bad Idea on Classic Cars
Many forum guides recommend wiring a load resistor in parallel with each LED turn signal to simulate incandescent current draw. This works electrically, but it is a poor choice for a classic car for three reasons:
- Heat generation: A typical 6-ohm, 50-watt load resistor dissipates about 25 watts of heat when active. Mounted to plastic or taped to a wiring harness, it will melt insulation and start a fire. Mounted to bare metal, it leaves a burn mark.
- Permanent modification: Load resistors require splicing into the turn signal wires, cutting the factory harness, exactly what this guide tells you to avoid.
- No reversibility: Once spliced in, removing it leaves exposed wire and solder joints worse than the original factory connection.
An electronic flasher relay solves the problem without any of these drawbacks. It is a direct replacement for the factory flasher, requires no wiring changes, and is fully reversible in 30 seconds.
Flicker and Voltage Instability: The Hidden Problem
Another common issue is flicker. If your new LED headlights flicker, the cause is usually a voltage drop or a poor ground connection. Check the ground strap from the battery to the chassis and the ground wire at the headlight housing. The U.S. Department of Energy guide on LED driver compatibility confirms that LEDs require a stable DC voltage, so cleaning and tightening all ground connections often resolves the issue.
There is a subtler problem specific to classic cars: voltage instability. A 1960s-era generator or early alternator can output anywhere from 11.5 volts at idle to 15.5 volts when charging. LEDs are sensitive to this fluctuation. A quality LED driver regulates current internally and smooths out these swings, but a cheap driver will pass the ripple through, causing visible flicker at certain RPMs.
If you have cleaned your grounds and still see flicker, the solution is a plug-and-play voltage stabilizer. These small devices connect inline between the factory harness and the LED driver, using a capacitor to smooth voltage ripple. They are available with the same H4 or H13 connectors as your LED bulbs, so installation is purely plug-and-play. Look for a stabilizer rated for at least 3 amps per channel and a capacitor of 470 microfarads or larger.
Dimming at Idle: A Relay Harness Fix
If your headlights dim when you press the brake or when the engine idles, you have a voltage drop in the factory switch circuit. A plug-and-play relay harness solves this by drawing power directly from the battery and using the factory switch only as a trigger, bypassing aged switch contacts and undersized wiring. The result is stable brightness at idle and no flicker when other electrical loads engage.
:::warning Never install load resistors to fix hyper-flash. These devices generate significant heat and are designed to be mounted to bare metal, not taped to your factory wiring harness. Incorrectly mounted resistors are a leading cause of melted wires and electrical fires in classic cars. Use an electronic flasher relay instead.
:::takeaway Hyper-flash and flicker are not signs that LED conversion is incompatible with classic cars. They are symptoms of two addressable problems: the flasher relay expecting incandescent current draw, and voltage instability from aging charging systems. Both have plug-and-play fixes that preserve your factory wiring and take less time to install than a load resistor.
Final Checks and Reversibility Documentation
Before you call the job done, verify that the high beam indicator on your dashboard works, as some LED kits cause this to stay on or not illuminate. Confirm that both low and high beam patterns have a sharp cutoff line and adequate reach. Finally, test the turn signals and hazards to ensure they flash at the normal rate.
Document every change you made. Take photos of the original wiring and new components before tucking them away. Keep all original halogen bulbs and hardware in a labeled box. This documentation is your reversibility plan, if you ever sell the car or enter it in a show, you can return it to factory stock in under an hour.
:::tip Before installing any LED bulb, compare its base depth to the back of your headlight housing. Some older housings have minimal clearance behind the bulb, and a long cooling fan may not fit without hitting the radiator support. Measure first, and you will avoid a frustrating mid-install discovery.
Upgrading your classic car's lighting should not compromise its originality. By choosing the right plug and play LED headlight conversion kits and understanding the classic car headlight relay harness benefits, you gain modern visibility while keeping your factory wiring intact. At RMS Lighting LLC, we research and test every product we sell, ensuring correct beam patterns, reliable drivers, and easy installation. Explore our selection of LED headlamp conversion kits and turn signal relays to see the difference a quality conversion makes. Learn More and drive your classic with confidence.
Frequently Asked Questions
Can you put LED lights in older cars without damaging the wiring?
Yes. The safest method uses plug-and-play LED conversion kits and replacement flasher relays that connect to the factory sockets. This approach avoids cutting or splicing wires, so you can return the car to its original state. For classic cars with fragile wiring, a dedicated relay harness is recommended. It draws power directly from the battery, protecting the original circuits and preventing voltage drop.
Do LED headlight bulbs require a relay harness for vintage vehicles?
Often, yes. Vintage electrical systems and their wiring can cause voltage drop, leading to dim LEDs or flicker. A classic car headlight relay harness benefits old wiring by using the factory switch to trigger a relay, which then sends full battery voltage directly to the bulbs. This protects the original wiring and ensures consistent brightness. Many kits are plug-and-play, requiring no cutting.
Are plug-and-play LED conversion kits legal for street use?
In the US, DOT compliance for LED headlight upgrades depends on the bulb's beam pattern and housing compatibility. A quality kit designed for your vehicle should produce a sharp cutoff to avoid blinding oncoming traffic. The safest route is to use a complete, DOT-compliant LED headlight assembly or a kit that is explicitly stated as street-legal. Retrofitting bulbs into unapproved housings can be illegal in some states.
How do I stop my LED turn signals from hyper-flashing?
Hyper-flashing occurs because the car's flasher relay detects lower electrical load from LEDs. The fix is simple: replace the stock thermal relay with an electronic LED flasher relay. These are designed to work with LED bulbs and restore the correct flash rate. Choose a 2-pin or 3-pin relay that matches your vehicle's socket configuration.
This article was written using GrandRanker